Module 11 Using Git and GitHub to implement version control
In this chapter, we will give you an overview of how to use Git and GitHub for your laboratory research projects. If you prefer an open-source version control platform, GitLab has similar functionality and can be installed on a server you own.
We’ll address two separate groups, in separate sections. As the main focus, we’ll overview how you can leverage and use these tools as the director or manager of a project, without knowing how to code in a language like R. We are focusing on this audience in this module, as we see this as an area where there aren’t a lot of available resources to provide guidance. GitHub provides a number of useful tools that can be used by anyone, providing a common space for managing the data recording, analysis and reporting for a scientific research project. In this case, there would need to be at least one member of your team who is comfortable with a programming language, to set up and maintain the GitHub repository, but all team members can participate in many features of the GitHub repository regardless of programming skill.
The other audience for information on using Git and GitHub are researchers who are comfortable coding. Fortunately, there are many good resources available for this audience. We’ll end the module by providing advice to this audience to point them to resources where they can go to learn more and fully develop these skills.
As examples, we’ll show different elements from two real GitHub repository, used for scientific projects and papers. The first repository is available at https://github.com/aef1004/cyto-feature_engineering. It provides example data and code to accompany a published article on a pipeline for flow cytometry analysis.256 The second repository is available at https://github.com/PodellLab/Granuloma_RSratio_ISH. It provides example data and code to accompany a published article on immune cell composition and replication status of Mycobacterium tuberculosis at the level of granulomas.257
Objectives. After this module, the trainee will be able to:
- Apply tools within a version control platform to manage a research project, even if some of the members are not coders
- Utilize visualization tools on a version control platform to explore the evolution of project files
- Utilize the Issues tracker on a version control platform to break a project into tasks and discuss details of each task with your team
- Describe roles and ownership on a repository on a version control platform
- Explain how a repository on GitHub can be switched between public and private states
11.1 Leveraging Git and GitHub as a non-coder
Because Git has its history in software development, and because most introductions to it quickly present arcane-looking code commands, you may have hesitations about whether it would be useful in your scientific research group. This is particularly likely to be the case if you, and many in your research group, do not have experience programming.
This is not at all the case. While Git itself traditionally has been used with a command-line interface (think of the black and green computer screens shown when movies portray hackers), GitHub has wrapped Git’s functionality with an attractive graphical user interface that is easy to understand. This is how you will interact with a project repository if you are online and logged into GitHub, rather than exploring it on your own computer (although there are also graphical user interfaces you can use to more easily explore Git repositories locally, on your computer).
In fact, the combination of Git and GitHub can become a secret weapon for your research group if you are willing to encourage those in your group who do know some programming (or are willing to learn a bit) to take the time to learn to set up a project in this environment for project management. Once a project has been set up in GitHub, there are a number of features that can be used by all team members, whether they code or not. These features facilitate collaboration between coders and non-coders as the data and code evolve. The major features and advantages of Git and GitHub are described in modules 9 and 10.
As mentioned in modules 9 and 10, repositories that are tracked with Git and shared through GitHub provide a number of tools that are useful in managing a project, both in terms of keeping track of what’s been done in the project and also for planning what needs to be done next, breaking those goals into discrete tasks, assigning those tasks to team members, and maintaining a discussion as you tackle those tasks.
You can go a long way by just starting with a subset of the tools that Git and GitHub offer. In this module, we’ll focus on:
- Exploring commits and commit history
- Tracking and making progress on issues
- Managing repository access and ownership
- Providing project documentation that will help others navigate the project files
At the end of this module, there is a video demonstration that walks you through the elements we’ve highlighted.
GitHub is free to join; while there are paid plans, the free plan is adequate for getting started. To create an account, visit https://github.com/. If you find you need more than the free plan provides, academic researchers can request free use of some of the more extensive versions if needed, or you can explore an open-source alternative, GitLab.
Even if you are not coding, you will need to be logged in to your GitHub account to contribute to a repository. For some actions, you need to be a collaborator on a project to take the action; in the later sections of this module, we describe how people can be added as collaborators in a GitLab repository.
11.1.1 Exploring commits and the commit history
A version control platform like GitHub can help with managing your projects by providing tools to visually explore how the project has evolved. Each time a team member makes a change to files in a GitHub repository, the change is recorded as a commit, and the team member must include a short commit message describing the change. Each file in the project will have its own page on GitHub (Figure 11.1 shows an example). You can see the history of changes to that files by clicking the “History” link on that page.
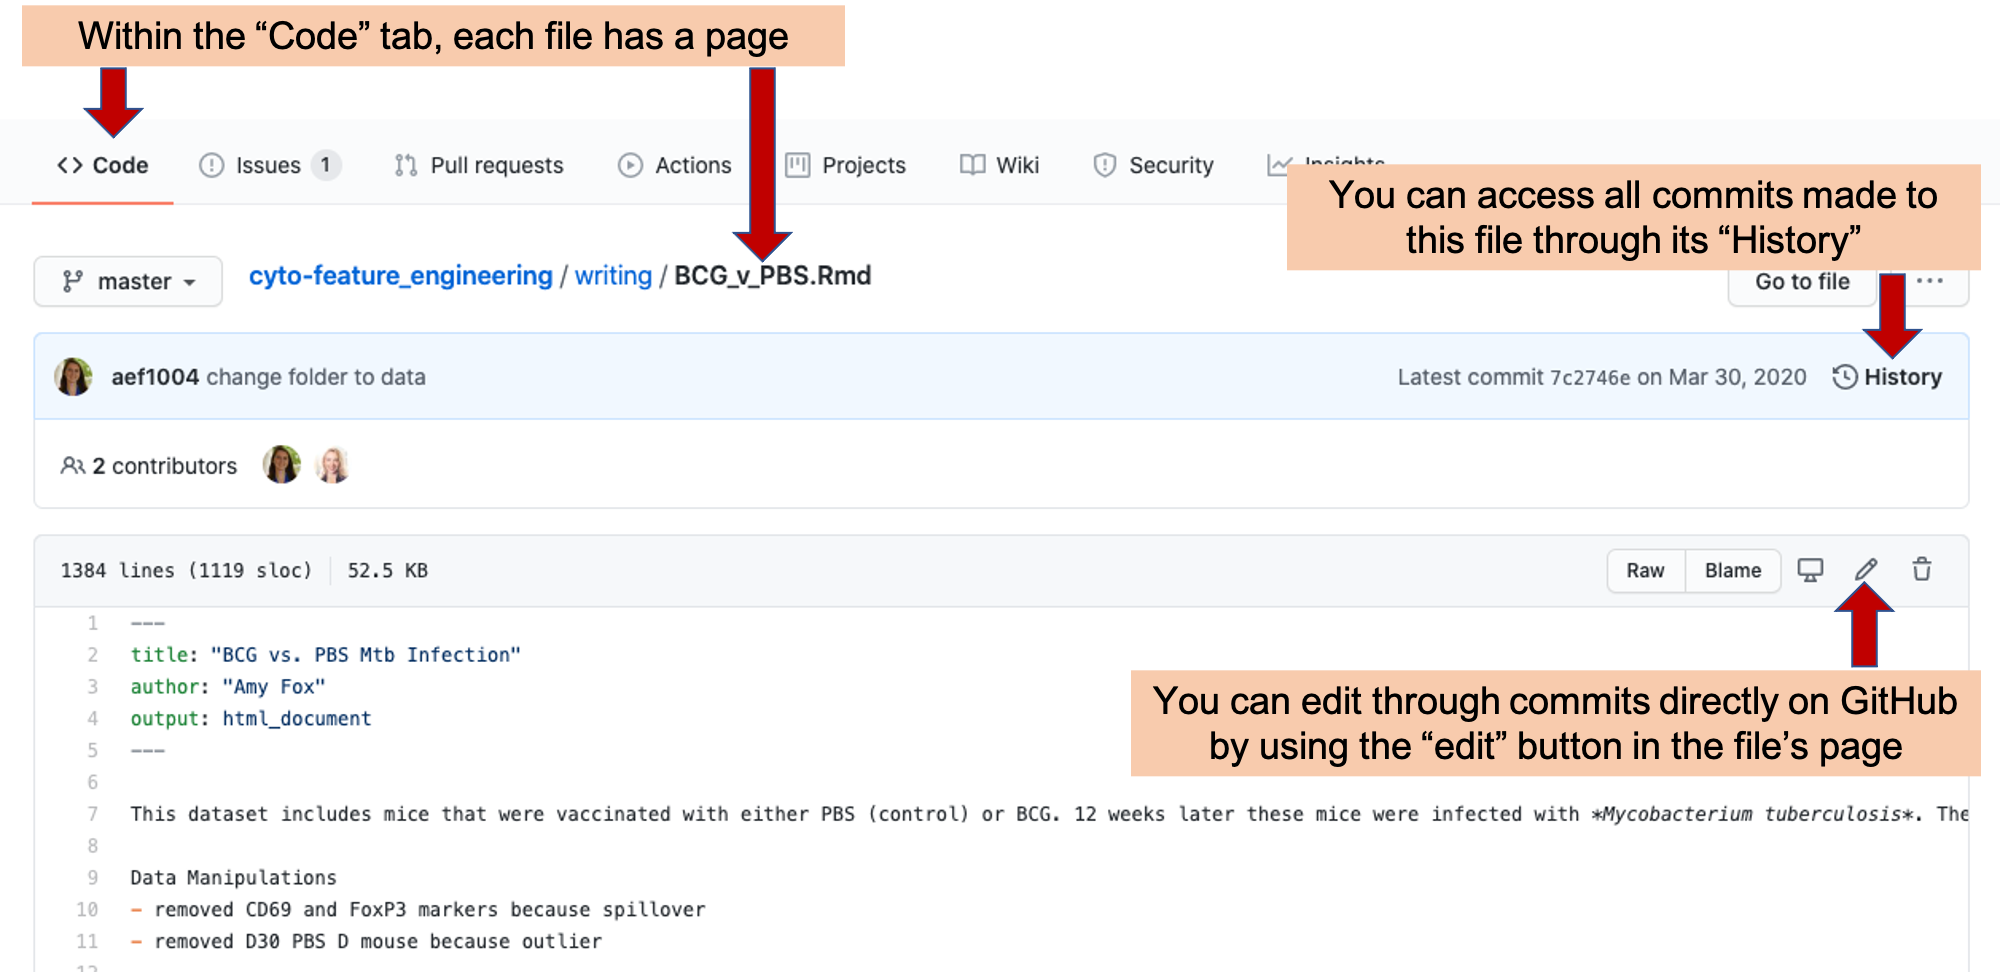
Figure 11.1: Example of a file page within a GitHub repository. Each file in a repository has its own page. On this page, you can see the history of changes made to the file by looking at ‘History’. You can also make a commit an edit directly in GitHub by clicking on the ‘Edit’ icon.
Figure 11.2 gives an example of how you can see the full history of changes that have been made to each file in the project. Each change is tracked through a commit, which includes markers of who made the change and a message describing the change. This allows you to quickly pinpoint changes in a file in your research project. Near the commit message are listings of which team member made the commit and when it was made. This also helps you see how team members have contributed as the file evolves.
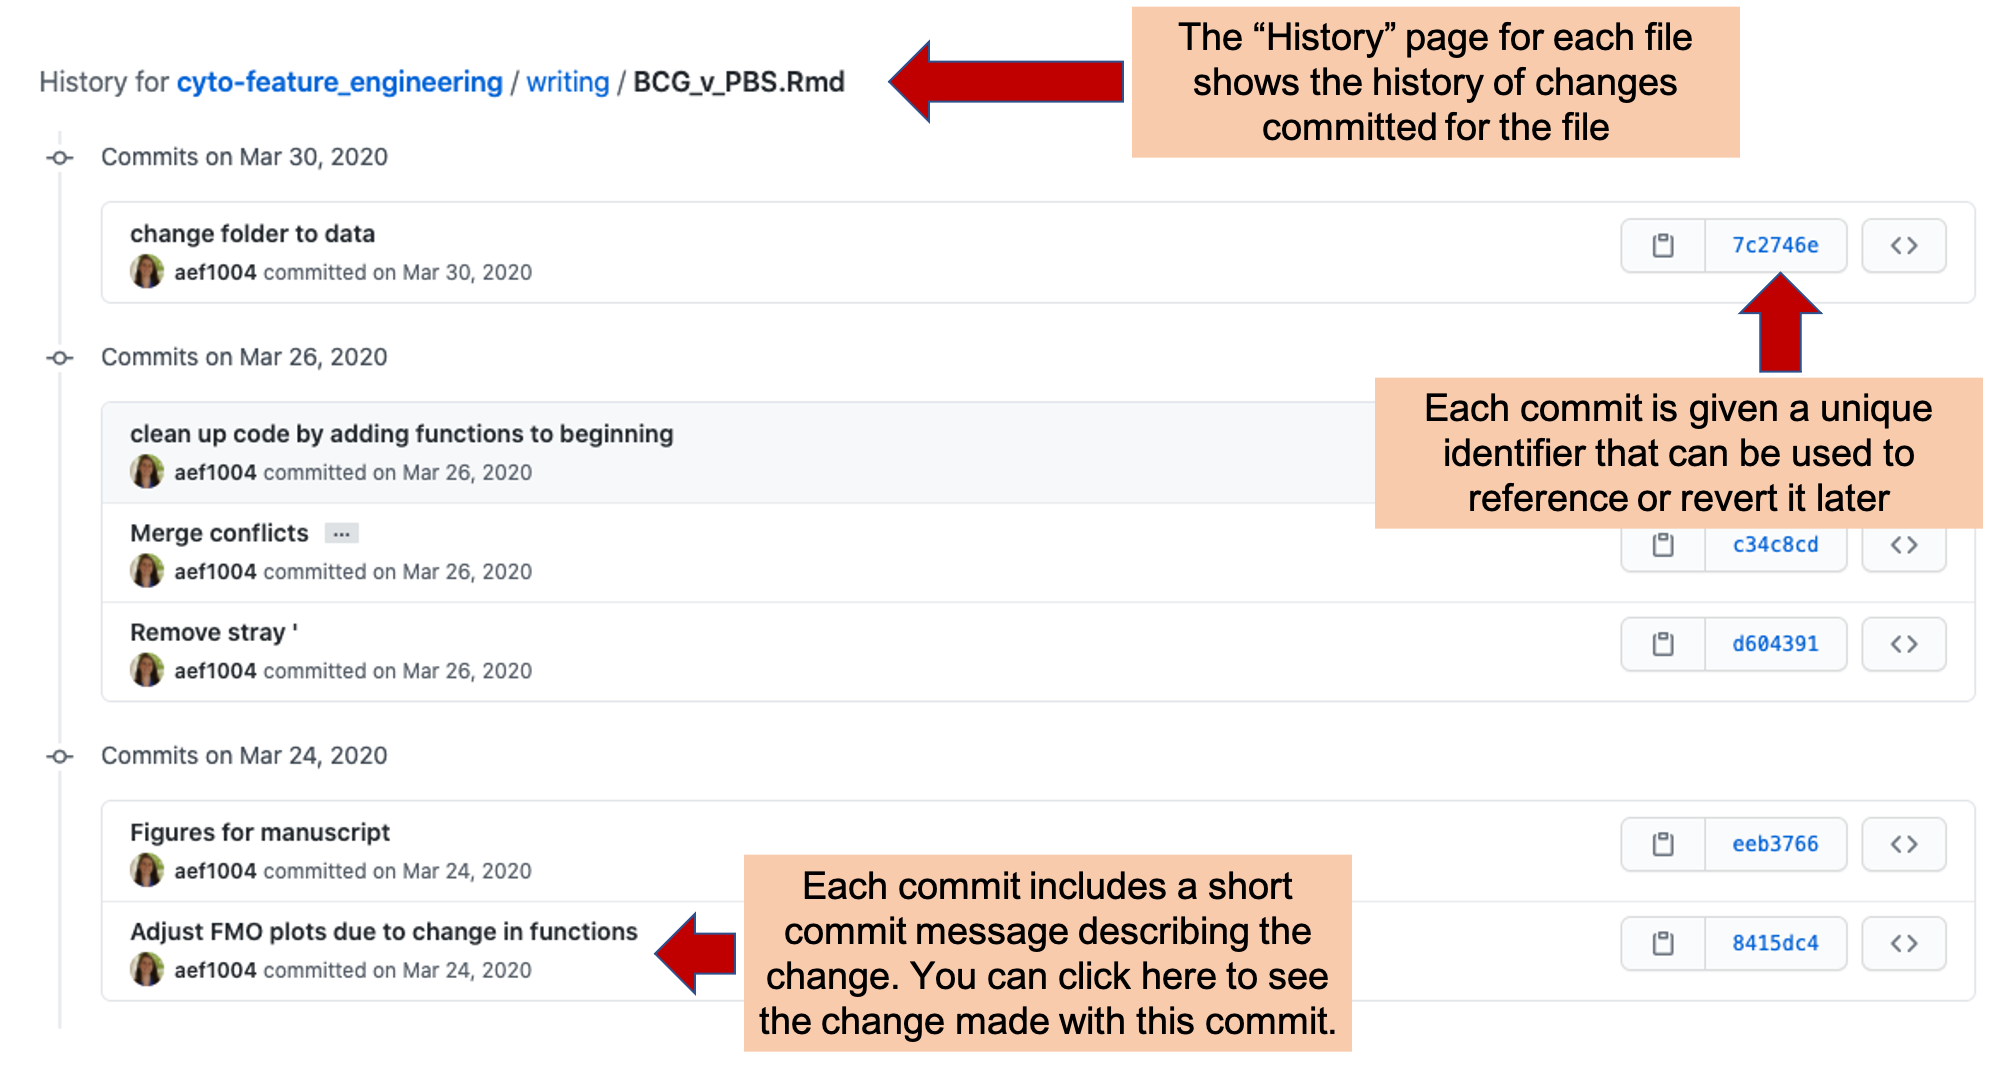
Figure 11.2: Commit history in GitHub. Each file in a repository has a ‘History’ page, where you can explore each change commited for the file. Each commit has a unique identifier and commit message describing the change. You can click on the entry for any of these commits to see the changes made to the file with the commit (see next figure).
If you click on one of the commits listed on a file’s History page (Figure 11.2 points to one example of where you would click), it will take you to a page providing information on the changes made with that commit (Figure 11.3). This page provides a line-by-line view of each change that was made to project files with that commit, as well as the commit message for that commit. If the person committing the change included a longer description or commentary, this information will also be included.
Within the body of the page, you can see the changes made with the commit. Added lines will be highlighted in green while deleted lines are highlighted in red. If only part of a line was changed, it will be shown twice, once in red as its version before the commit, and once in green showing its version following the commit. You can visually compare the two versions of the line to see how it was changed with the commit.
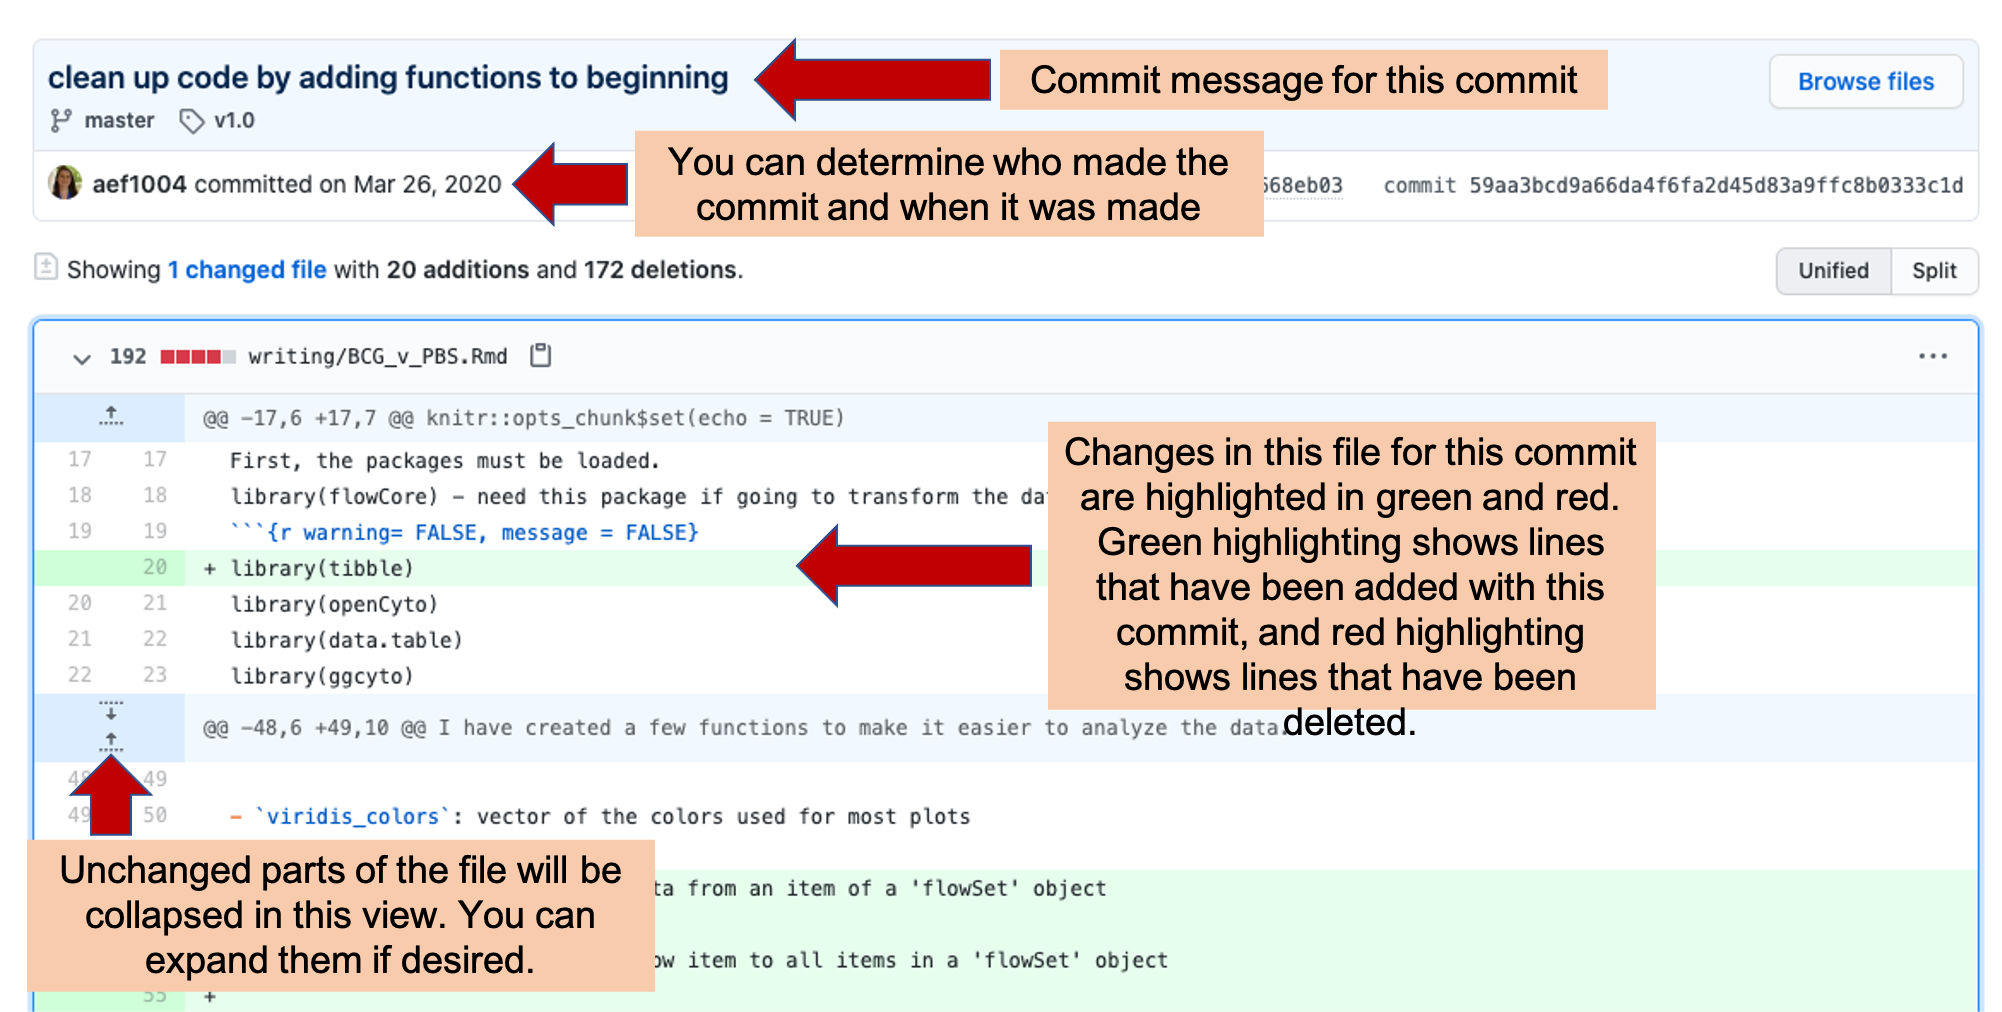
Figure 11.3: Commit history in GitHub. Each commit has its own page, where you can explore what changes were made with the commit, who made them, and when they were committed.
The page shown in Figure 11.1 also allows you to make your own edits to the file and commit them. For team members who are working a lot on coding, they will usually make changes to a file locally, on the repository copy on their own computers and then push their latest changes to the GitHub version. This workflow will allow them to test the code locally before they update the GitHub version.
However, it is also possible to make a commit directly on GitHub, and this may be a useful option for team members who are not coding and would like to make small changes to the writing files. On the file’s page on GitHub, there is an “Edit” icon (Figure 11.1). By clicking on this, you will get to a page where you can directly edit the file (Figure 11.4 shows an example of what this page looks like). Once you have made your edits, you will need to commit them, along with a short description of the commit, the “commit message”. If you would like to include a longer explanation of your changes, there is space for that, as well, when you make the commit (Figure 11.4). These commits will show up in the repository’s history, attributed to you and with your commit message attached to the change.
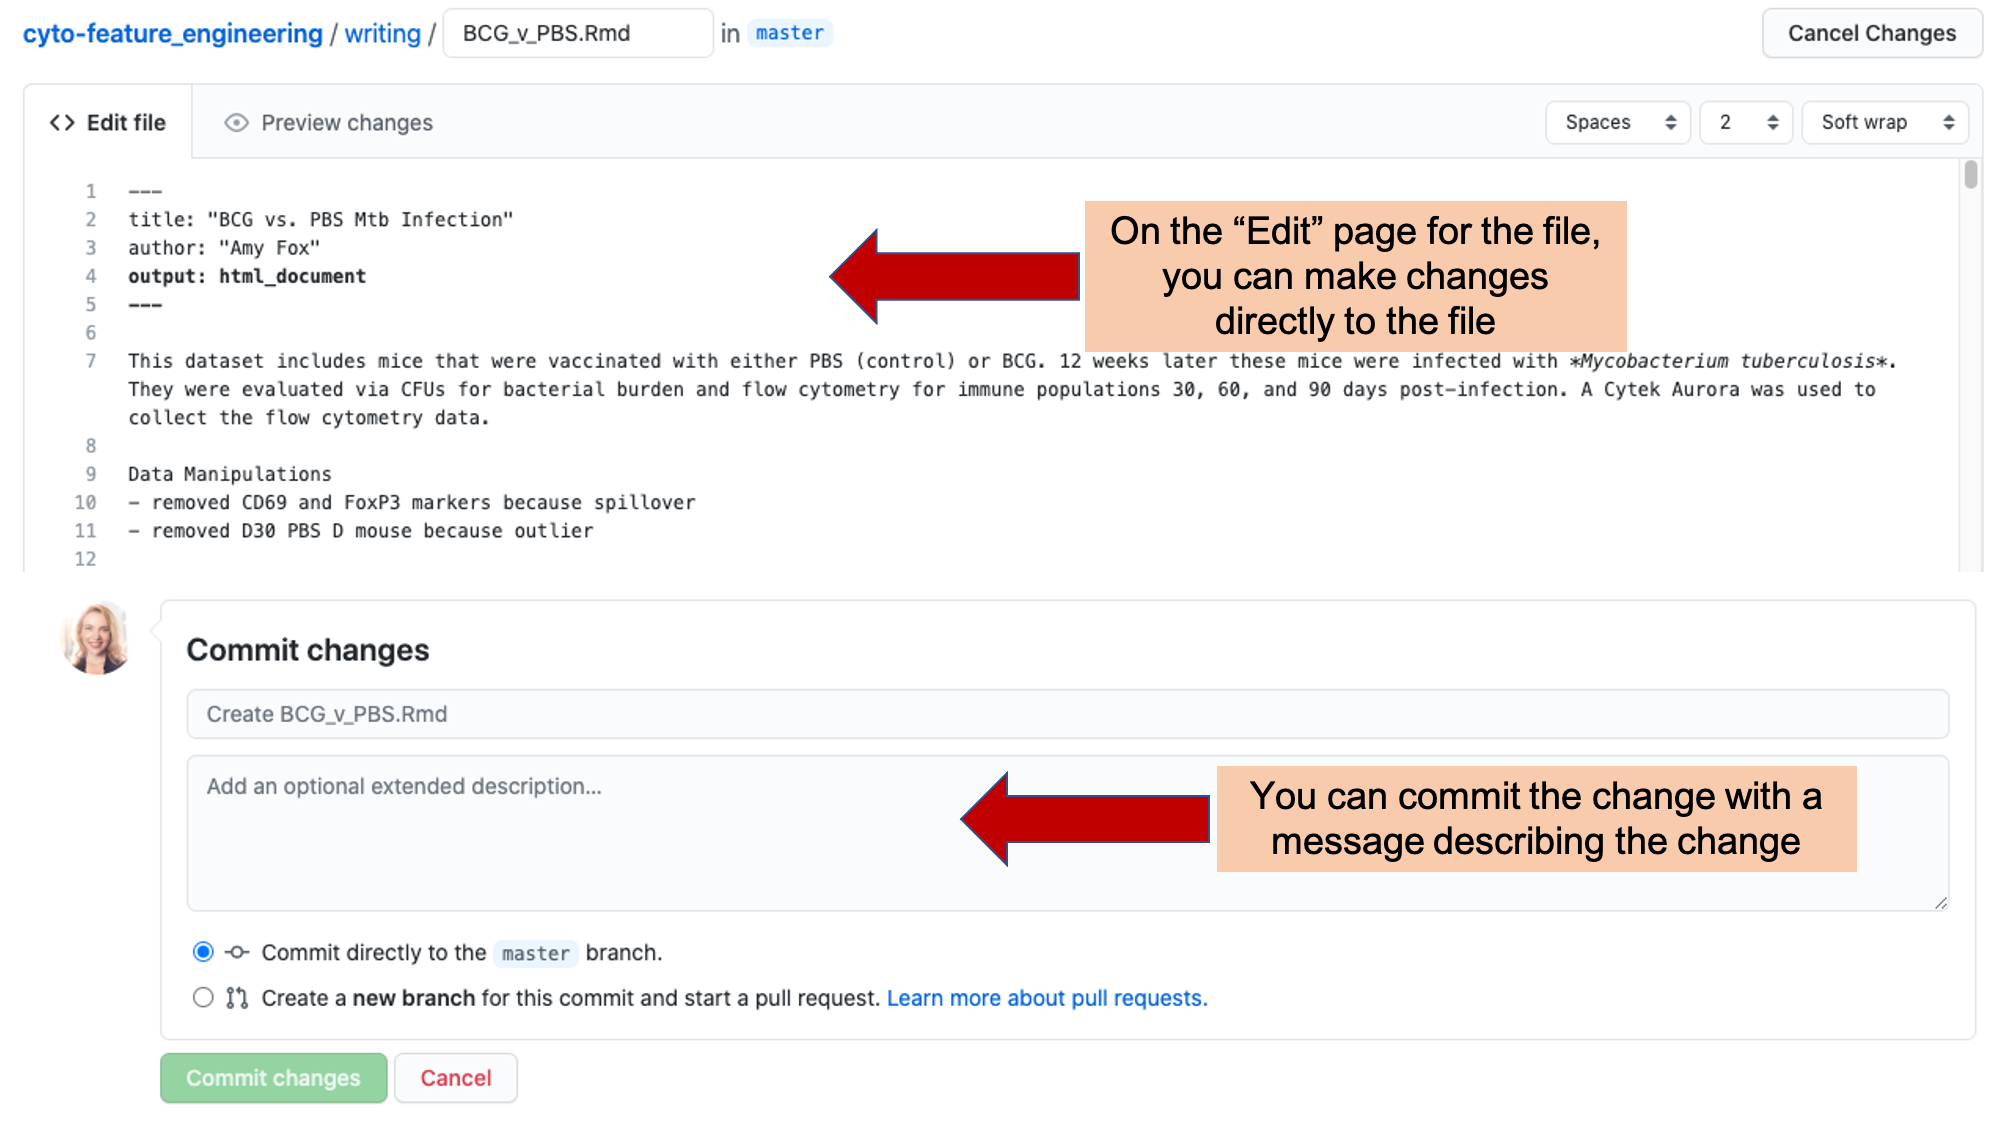
Figure 11.4: Committing changes directly in GitHub. When you click on the ‘Edit’ button in a file’s GitHub page (see previous figure), it will take you to a page where you can edit the file directly. You save the changes with a ‘commit’, including a commit message describing why you made the change. The change will be tagged with the message and your name.
11.1.2 Tracking and making progress on issues
Another way that a version control platform like GitHub can help you manage a project is through the “Issues” tracker. As we described in module 10, this Issues page can serve as a “to-do” list for the project as a whole. It lets you keep track of the tasks that need to be done, as well as have detailed conversations with your team about each task.
Each repository includes this type of tracker, and it can be easily used by all team members, whether they are comfortable coding or not. Figure 11.5 gives an example of the Issues tracker page for the repository we are using as an example. There will be a main Issues page, like one shown in this figure, as well as separate pages for each Issue.
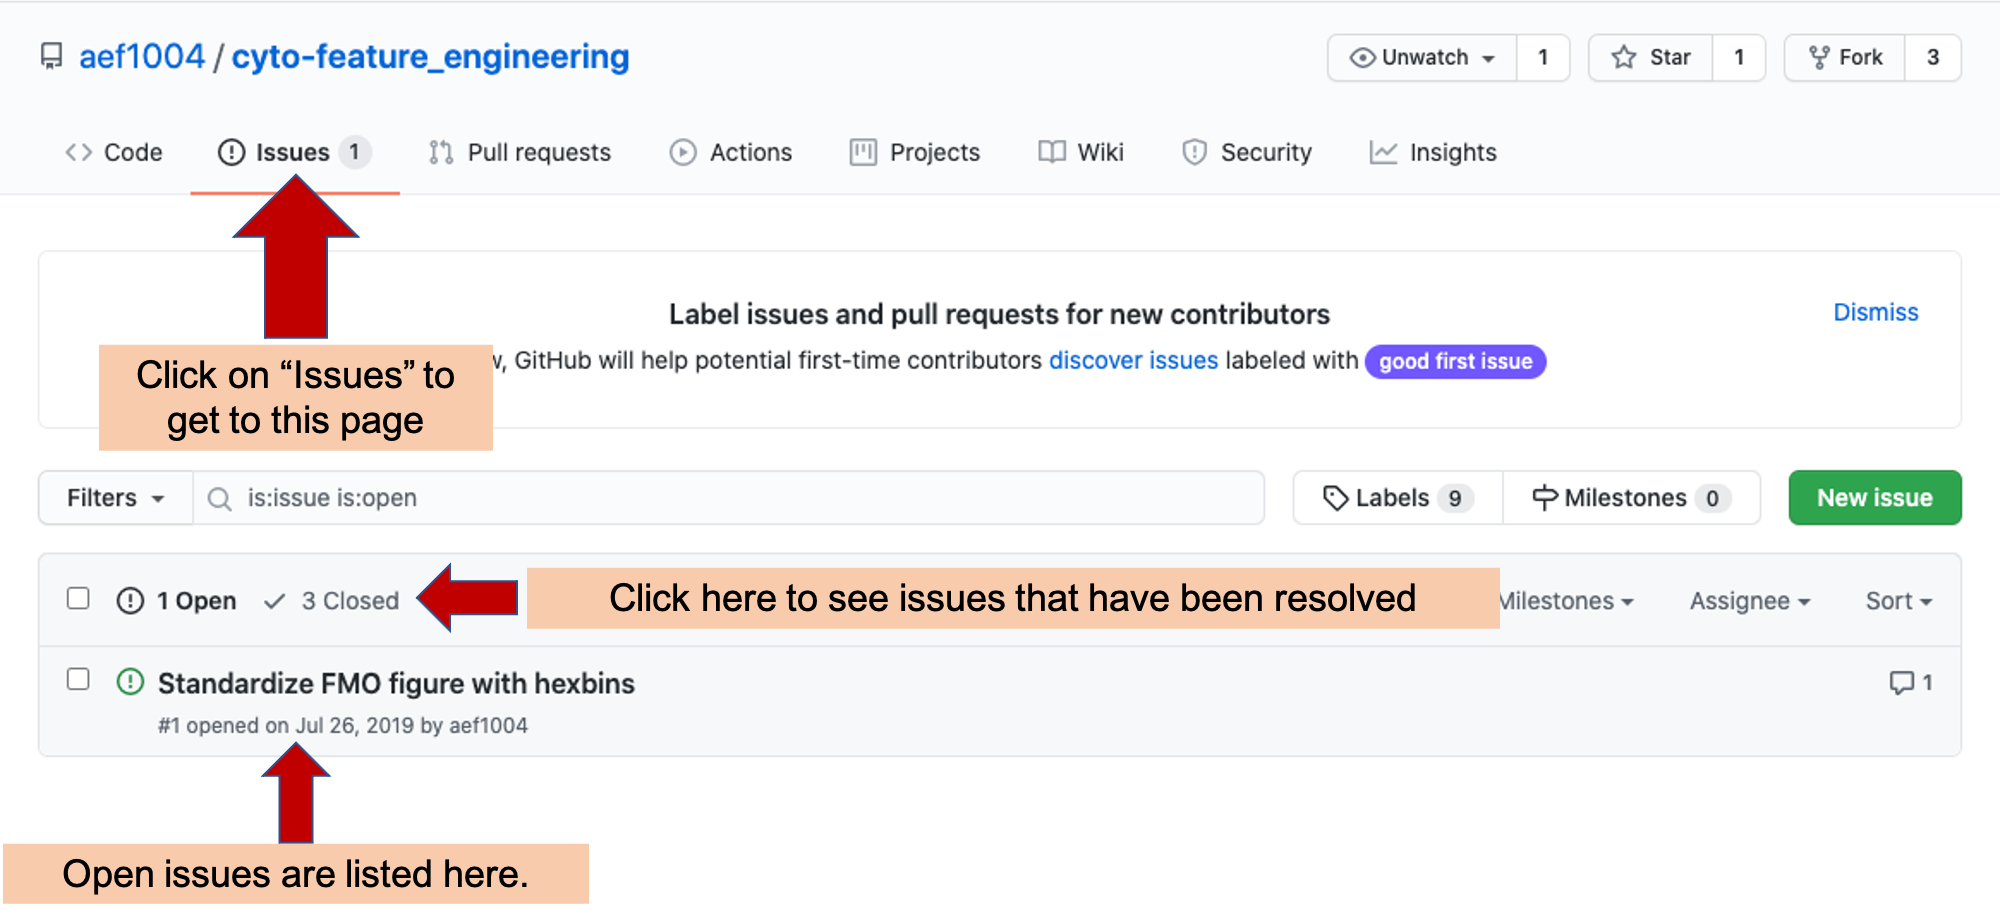
Figure 11.5: Issues tracker page for an example GitHub repository. Arrows highlight the tab to click to get to the Issues tracker page in a repository, as well as where to go to find open and closed Issues for the repository.
The main Issues tracker page provides clickable links to all open issues for the repository. You can open a new issue using the “New Issue” on this main page or on the specific page of any of the repository’s issues. See Figure 11.6 for an example of this button.
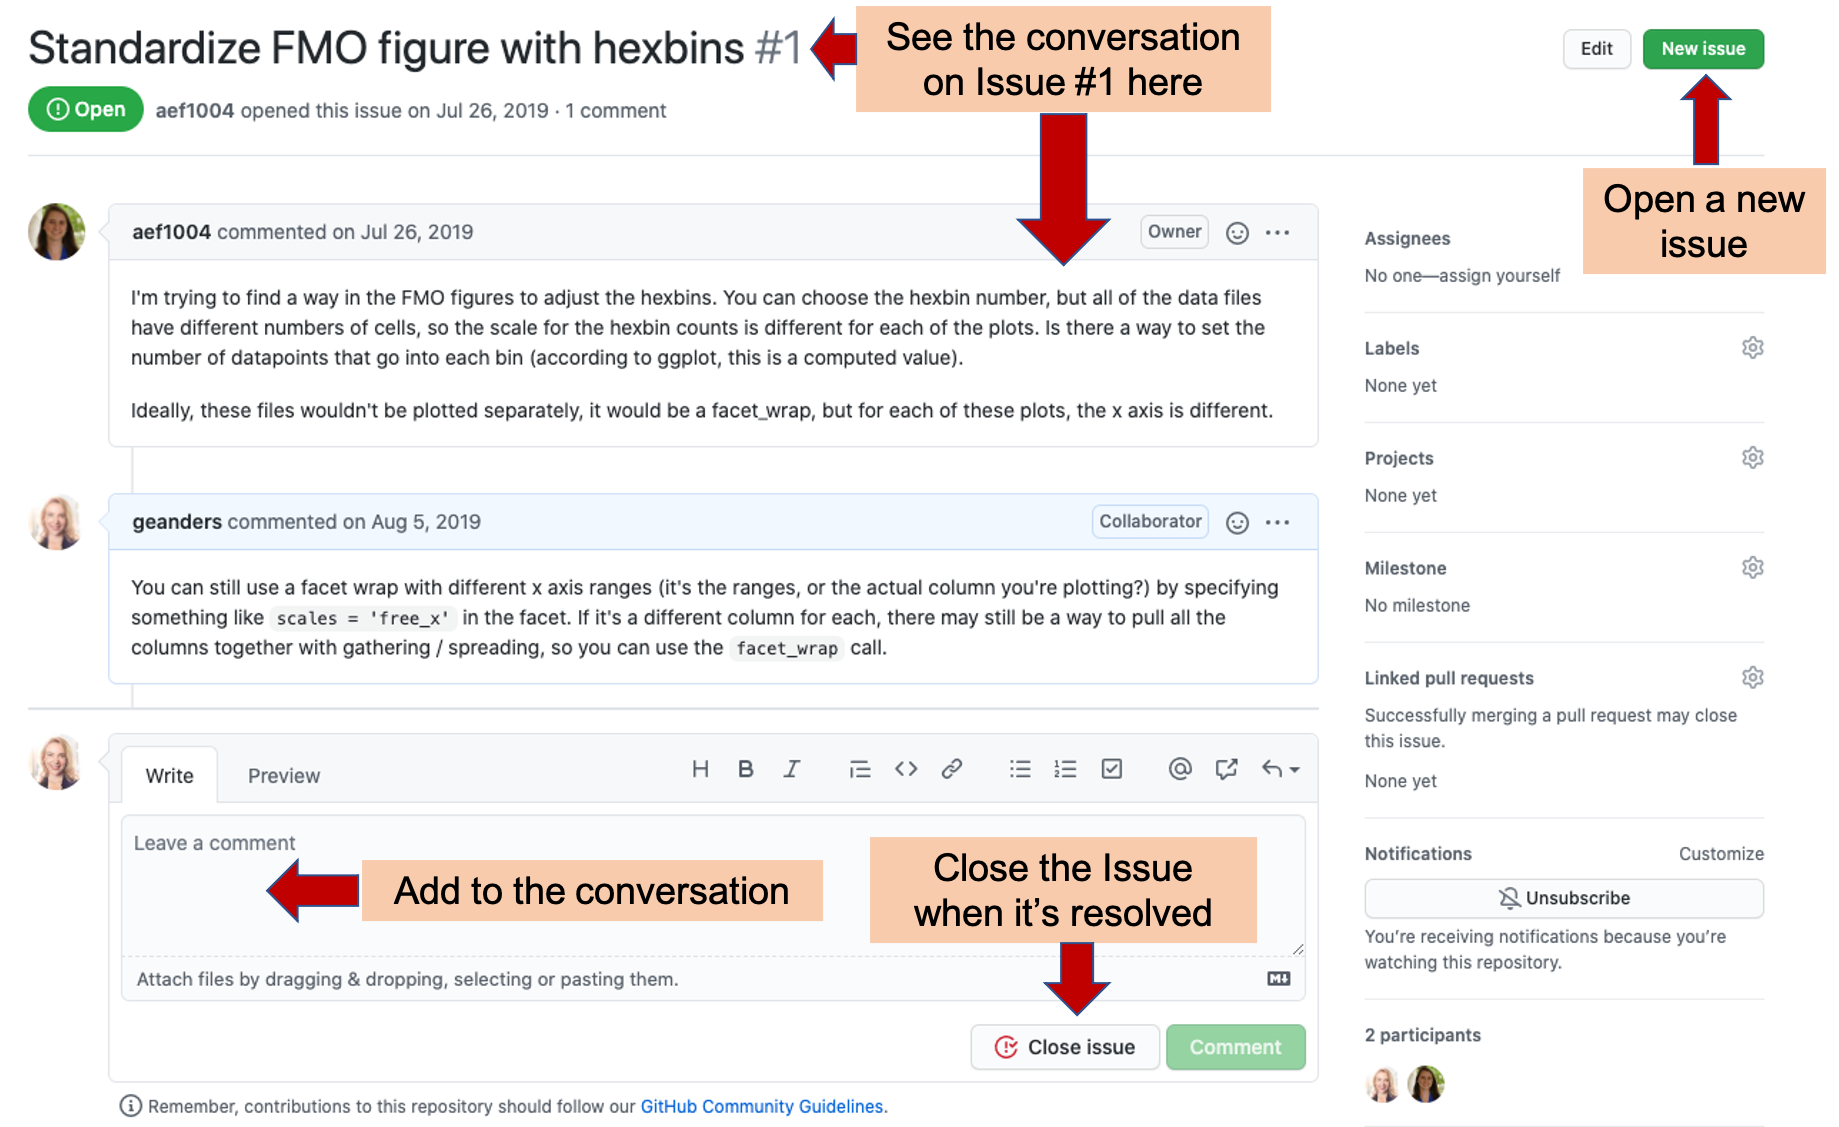
Figure 11.6: Conversation about an Issue on Issues tracker page of an example GitHub repository. In this example, you can see how GitHub Issues trackers allow you to discuss how to resolve an issue across your team. From this page, you can read the current conversation about Issue #1 of the repository and add your own comments. Once the Issue is resolved, you can ‘Close’ the Issue, which moves it off the list of active issues, but allows you to still re-read the conversation and, if necessary, re-open the issue later. You can also open a new issue from this page, using the button highlighted at the top right.
On the page for a specific issue (e.g., Figure 11.6), you can have a conversation with your team to determine how to resolve the issue. This conversation can include web links, figures, and even lists with check boxes, to help you discuss and plan how to resolve the issue. Each issue is numbered, which allows you to track each individually as you work on the project.
Once you have resolved an issue, you will close it, using a “Close” button on the Issue’s page (see Figure 11.6 for an example). This moves the issue from the active list into a “Closed” list. Each closed issue still has its own page, where you can read through the conversation describing how it was resolved. If you need to, you can re-open a closed issue later, if you determine that it was not fully resolved. Figure 11.5 shows where to go to see a list of closed Issues for a project.
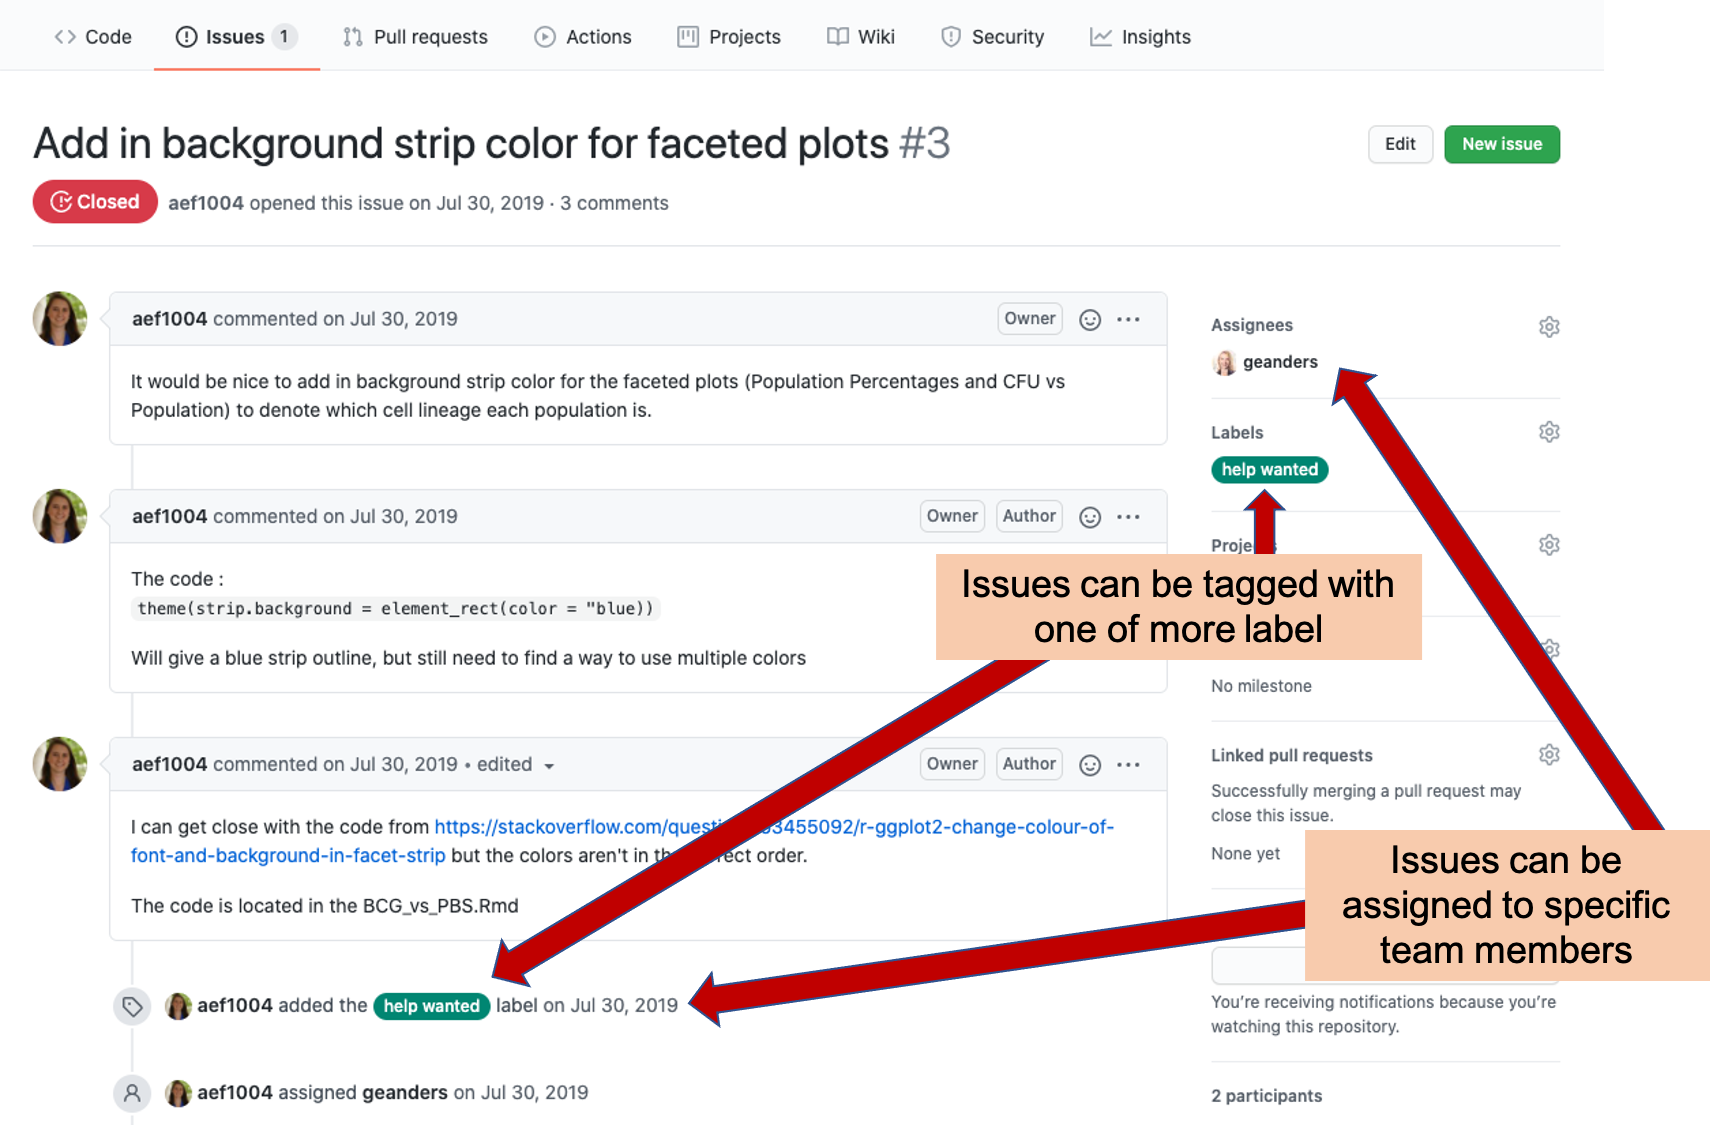
Figure 11.7: Labeling and assigning Issues. The GitHub Issues tracker allows you to assign each issue to one or more team members, clarifying that they will take the lead in resolving the issue. It also allows you to tag each issue with one or more labels, so you can easily navigate to issues of a specific type or identify the category of a specific issue.
The Issues tracker page includes more advanced functionality, as well (Figure 11.7). For example, you can assign an issue to one of more team members, indicating that they are responsible for resolving that issue. You can also tag each issue with one of more labels, allowing you to group issues into common categories. For example, you could tag all issues that cover questions about pre-processing the data using a “pre-processing” label, and all that are related to creating figures for the final manuscript with a “figures” label.
Managing repository access and ownership
Repositories include functionality for inviting team members, assigning roles, and otherwise managing access to the repository. First, a repository can be either public or private. For a public repository, anyone will be able to see the full contents of the repository through GitHub. You can also set a repository to be private. In this case, the repository can only be seen by those who have been invited to collaborate on the repository, and only when they are logged in to their GitHub accounts. The private / public status of a repository can be changed at any time, so if you want you can maintain a repository for a project as private until you publish the results, and then switch it to be public, to allow others to explore the code and data that are linked to your published results.
You can invite team members to collaborate on a repository, as long as they have GitHub accounts. While public repositories can be seen by anyone, the only people who can add to or change the contents of the repository are people who have been invited to collaborate on the repository. The person who creates the repository (the repository “owner”) can invite other collaborators through the “Settings” tab of the repository, which will have a “Manage access” function for the repositories maintainer. Only the owner of the repository will have access to this tab for the repo. On this page, you can invite other collaborators by searching using their GitHub “handle” (the short name they chose to be identified by in GitHub). You can also change access rights, for example, allowing some team members to be able to make major changes to the repository—like deleting it—while others can make only smaller modifications.
[Add: Roles on a repository]
If you are the owner of a repository, or have administrator rights on an organization repository, you will have access to an additional page for the repository—the “Settings” page. Figure 11.8 shows the tab that you’ll click on to access this Settings page. (If you do not see this tab when you’re exploring a repository, you either do not have owner-level rights for that repository or you aren’t logged in to your GitHub account.)
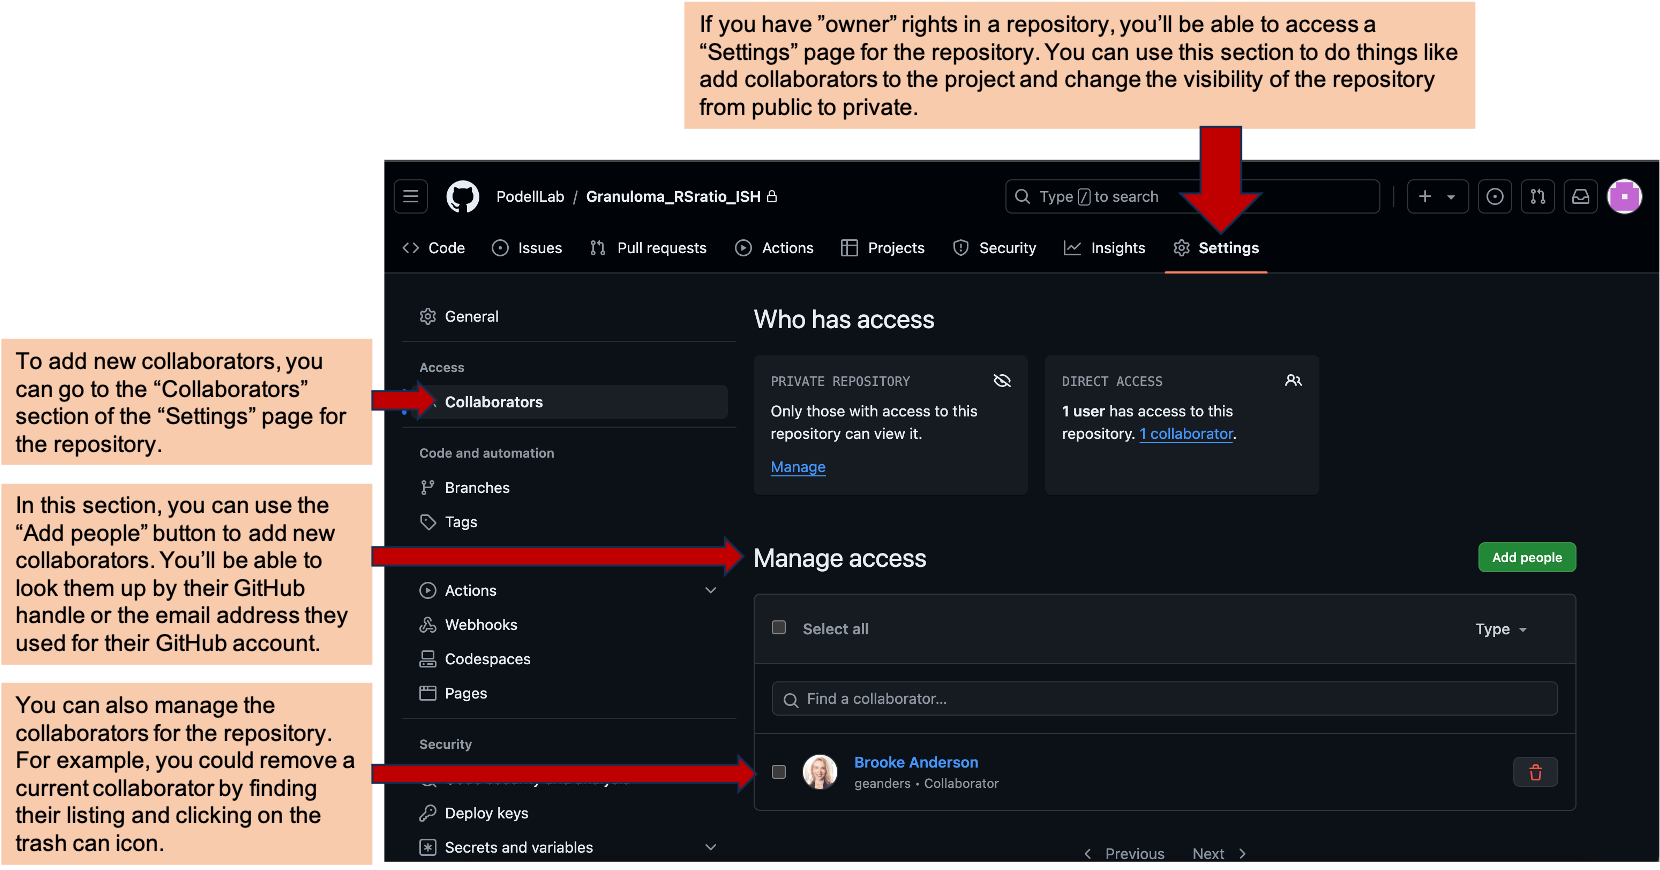
Figure 11.8: If you have owner-level rights to a repository, you will have access to an additional page on the repository, called ‘Settings’. You can use this page for several administrative tasks for the repository. For example, you can add or remove collaborators for the repository.
You can use the Settings page to manage the collaborators for the project. If you go to the “Collaborators” section of the Settings page (Figure 11.8), you can add new collaborators using the “Add people” button. This will allow you to search for a new collaborator using either their GitHub handle or the email they used to set up their GitHub account. Once you invite someone, they will get an email invitation, and they can respond to that invitation to join as a collaborator on the repository. You can also use this area to manage people who are already collaborators. For example, if you need to remove a collaborator from the project, you can do that in this “Collaborators” section of the Settings page for the repository.
If you are the owner of a repository (or have administrative rights on an organization-style repository), you will be able to change the repository visibility, toggling it between private and public or vice-versa. You’ll do this on the Settings page of the repository. If you scroll down that page, you’ll get to an area called the “Danger Zone”, as shown in Figure 11.9. In this section, there’s a line labeled “Change repository visibility”. Here you can click on a button to “Change visibility”. If the repository is currently private, this brings up the option to “Change to public”. Once you click this, anyone will be able to view that repository using the repository’s web link. If you are using the repository for a paper, you could use this functionality to change the repository from private—while you’re working on the paper—to public—once you’ve published the paper and want to share the code and data.
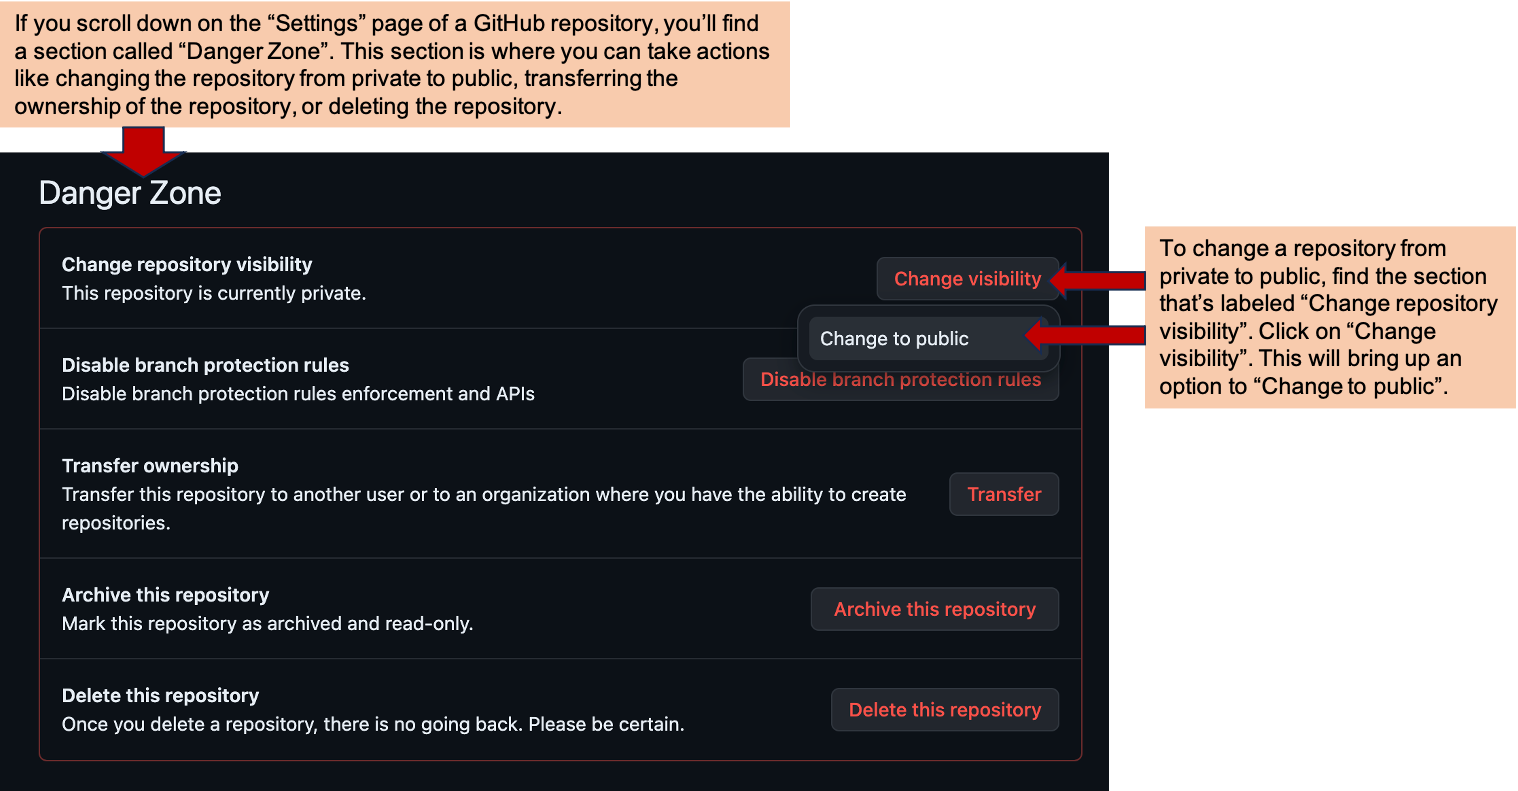
Figure 11.9: If you have owner-level rights for a repository, you can change the visibility of the repository. To do this, go to the ‘Settings’ page of the repository and scroll down to the ‘Danger Zone’ section, shown here. In this section, you can change the repository from private to public using the option to ‘Change repository visibility’.
11.1.3 Providing project documentation
[Add: README with Markdown]
If you are planning to use GitHub as a way to share the project directory, you will find it useful to create the README file using a file format called “Markdown”. [Automatically renders in a nice format when you put it on GitHub]
- Module 7: metadata, README
- Markdown renders nicely when posted on GitHub
- Show example from Amy’s project
11.2 Leveraging Git and GitHub as a scientist who programs
To be able to leverage GitHub to manage projects and share data, you will need to have at least one person in the research group who can set up the initial repository. GitHub repositories can be created very easily starting from an RStudio Project, a format for organizing project files that was described in module 7.
There are many excellent resources that provide instructions on this topic meant for researchers who are comfortable with using R and RStudio. An excellent place to start is with an online book written by Jenny Bryan named Happy Git and GitHub for the useR. This book is available for free at https://happygitwithr.com/. It provides a gentle yet thorough introduction to using Git, connecting it to RStudio Projects, and connecting everything with an online version control platform like GitHub. It also includes a helpful section that covers what a daily workflow will look like when you are using Git and GitHub in conjunction with projects that include R code.
Once you’ve explored that resource, some others you might find useful are:
- Software Carpentry’s introduction to version control with Git, available at https://swcarpentry.github.io/git-novice/
- Article on A Quick Introduction to Version Control with Git and GitHub258
- Article on Ten Simple Rules for Taking Advantage of Git and GitHub259