2.11 Using git and GitLab to implement version control
For many years, use of version control required use of the command line, limiting its accessibility to researchers with limited programming experience. However, graphical interfaces have removed this barrier, and RStudio has particularly user-friendly tools for implementing version control. In this module, we will show how to use git through RStudio’s user-friendly interface and how to connect from a local computer to GitLab through RStudio.
Objectives. After this module, the trainee will be able to:
- Understand how to set up and use git through RStudio’s interface
- Understand how to connect with GitLab through RStudio to collaborate on
research projects while maintaining version control
2.11.1 How to use version control
In this chapter, we will give you an overview of how to use git and GitHub for your laboratory research projects. In this chapter, we’ll address two separate groups, in separate sections. First, we’ll provide an overview of how you can leverage and use these tools as the director or manager of a project, without knowing how to code in a lanugage like R. GitHub provides a number of useful tools that can be used by anyone, providing a common space for managing the data recording, analysis and reporting for a scientific research project. In this case, there would need to be at least one member of your team who is comfortable with a programming language, but all team members can participate in many features of the GitHub repository regardless of programming skill.
Second, we’ll provide some details on the “how-tos” of setting up and using git and GitHub for scientists who are programmers or learning to program in a language like R or Python. We will not be exhaustive in this section, as there are a number of excellent resources that already go into depth on these topics. Instead, we provide an overview of getting starting, and what tools you might want to try within projects, and then provide advice on more references to follow up with to learn more and fully develop these skills.
As an example, we’ll show different elements from a real GitHub repository, used for scientific projects and papers. The first repository is available at https://github.com/aef1004/cyto-feature_engineering. It provides example data and code to accompany a published article on a pipeline for flow cytometry analysis (Fox et al. 2020).
2.11.2 Leveraging git and GitHub as a project director
Because git has a history in software development, and because most
introductions to it quickly present arcane-looking code commands, you may have
hesitations about whether it would be useful in your scientific research group
if you, and many in your research group, do not have experience programming.
This is not at all the case, and in fact, the combination of git and GitHub can
become a secret weapon for your research group if you are willing to encourage
those in your group who do know some programming (or are willing to learn a bit)
and to take them time to try out this environment for project managemment.
As mentioned in the previous two chapters, repositories that are tracked with git and shared through GitHub provide a number of tools that are useful in managing a project, both in terms of keeping track of what’s been done in the project and also for planning what needs to be done next, breaking those goals into discrete tasks, assigning those tasks to team members, and maintaining a discussion as you tackle those tasks.
While git itself traditionally has been used with a command-line interface
(think of the black and green computer screens shown when movies portray
hackers), GitHub has wrapped git’s functionality with an attractive and easy
to understand graphical user interface. This is how you will interact with a
project repository if you are online and logged into GitHub, rather than
exploring it on your own computer (although there are also graphical user
interfaces you can use to more easily explore git repositories locally, on your
computer).
Key project management tools for GitHub that you can leverage, all covered in subsections below, are:
- Commits and commit history
- Issues
- Repository access and ownership
- Insights
Successfully using GitHub to help track and manage a research project does not require using all of these tools, and in fact you can go a long way by just starting with a subset. The first four covered (Commits, Issues, Commit history, and Repository access and ownership) would be a great set to try out in a first project.
Commits
Each time a team member makes a change to files in a GitHub repository, the change is recorded as a commit, and the team member must include a short commit message describing the change. Each file in the project will have its own page on GitHub (Figure 2.5), and you can see the history of changes to that files by clicking the “History” link on that page.
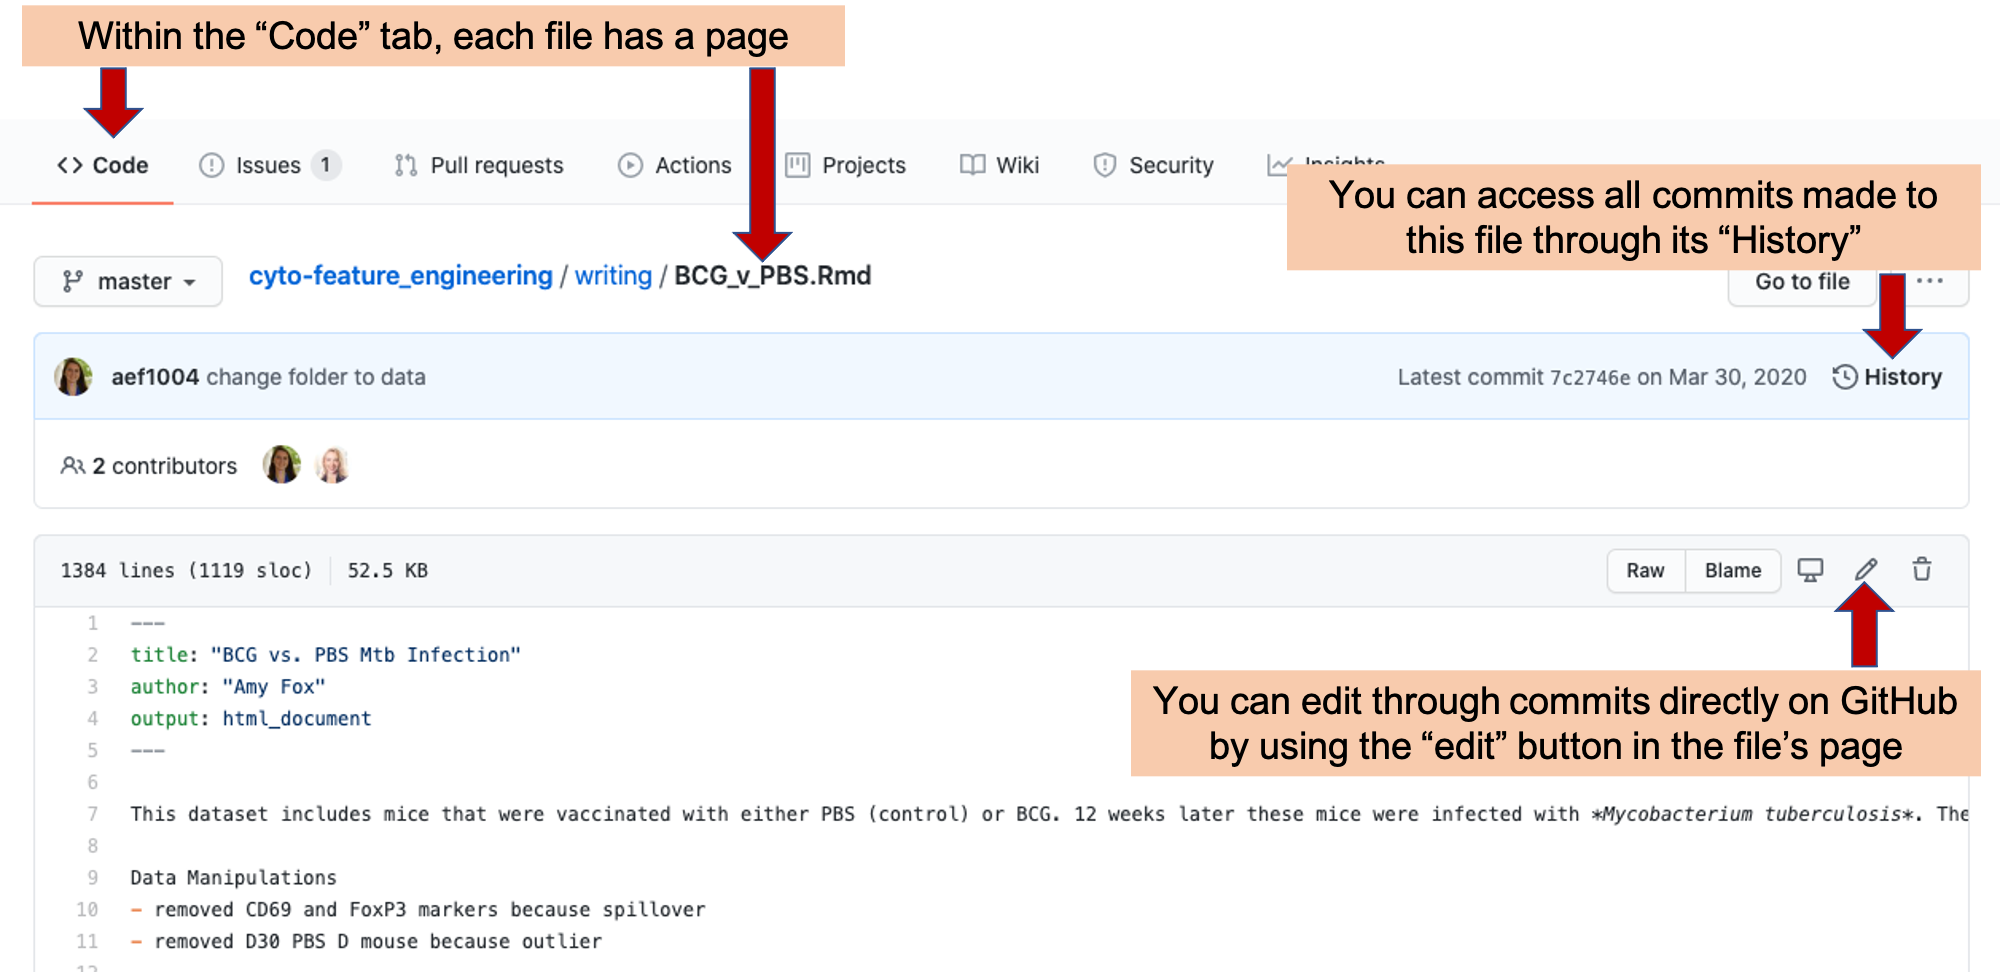
Figure 2.5: Example of a file page within a GitHub repository. Each file in a repository has its own page. On this page, you can see the history of changes made to the file by looking at ‘History.’ You can also make a commit an edit directly in GitHub by clicking on the ‘Edit’ icon.
You can make changes to a file locally, on the repository copy on your own computer. For team members who are working a lot on coding, this will likely be the primary method they use to make commits, as this allows you to test the code locally before you commit it.
However, it is also possible to make a commit directly on GitHub, and this may be a useful option for team members who are not coding and would like to make small changes to the writing files. On the file’s page on GitHub, there is an “Edit” icon (Figure 2.5). By clicking on this, you will get to a page where you can directly edit the file (Figure 2.6). Once you have made your edits, you will need to commit them, and a short description of the commit is required. If you would like to include a longer explanation of your changes, there is space for that, as well, when you make the commit (Figure 2.6).
Figure 2.6: Committing changes directly in GitHub. When you click on the ‘Edit’ button in a file’s GitHub page (see previous figure), it will take you to a page where you can edit the file directly. You save the changes with a ‘commit,’ including a commit message describing why you made the change. The change will be tagged with the message and your name.
You can see the full history of changes that have been made to each file in the project (Figure 2.7). Each change is tracked through a commit, which includes markers of who made the change and a message describing the change. Further, this history page for the file provides a line-by-line history of when each line in the file was last changed and what that change is—this allows you to quickly pinpoint changes in a particular part of the file.
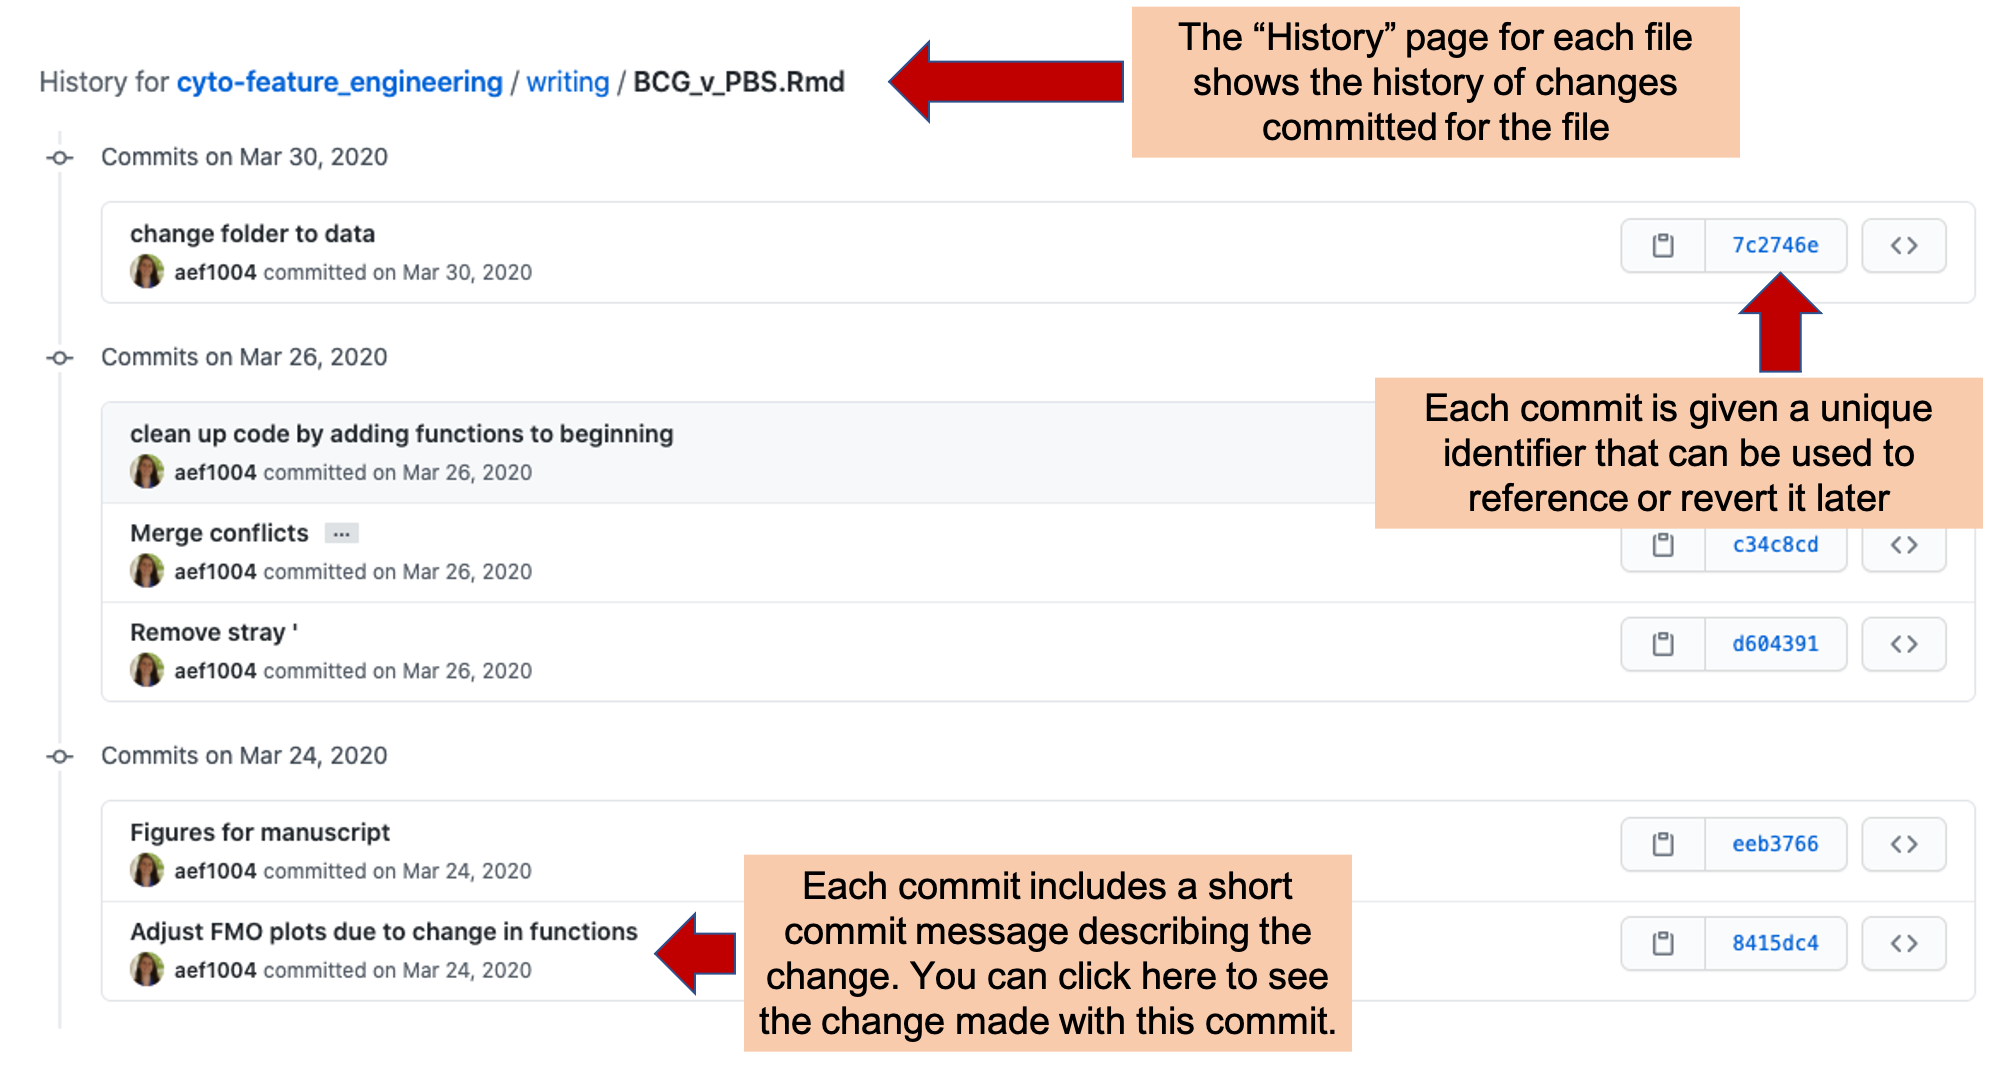
Figure 2.7: Commit history in GitHub. Each file in a repository has a ‘History’ page, where you can explore each change commited for the file. Each commit has a unique identifier and commit message describing the change. You can click on the entry for any of these commits to see the changes made to the file with the commit (see next figure).
If you click on one of the commits listed on a file’s History page (Figure 2.7, it will take you to a page providing information on the changes made with that commit (Figure 2.8). This page provides a line-by-line view of each change that was made to project files with that commit. This page includes the commit message for that commit. If the person committing the change included a longer description or commentary on the commit, this information will also be included on this page. Near the commit message are listings of which team member made the commit and when it was made. Within the body of the page, you can see the changes made with the commit. Added lines will be highlighted in green while deleted lines are highlighted in red. If only part of a line was changed, it will be shown twice, once in red as its version before the commit, and once in green showing its version following the commit.
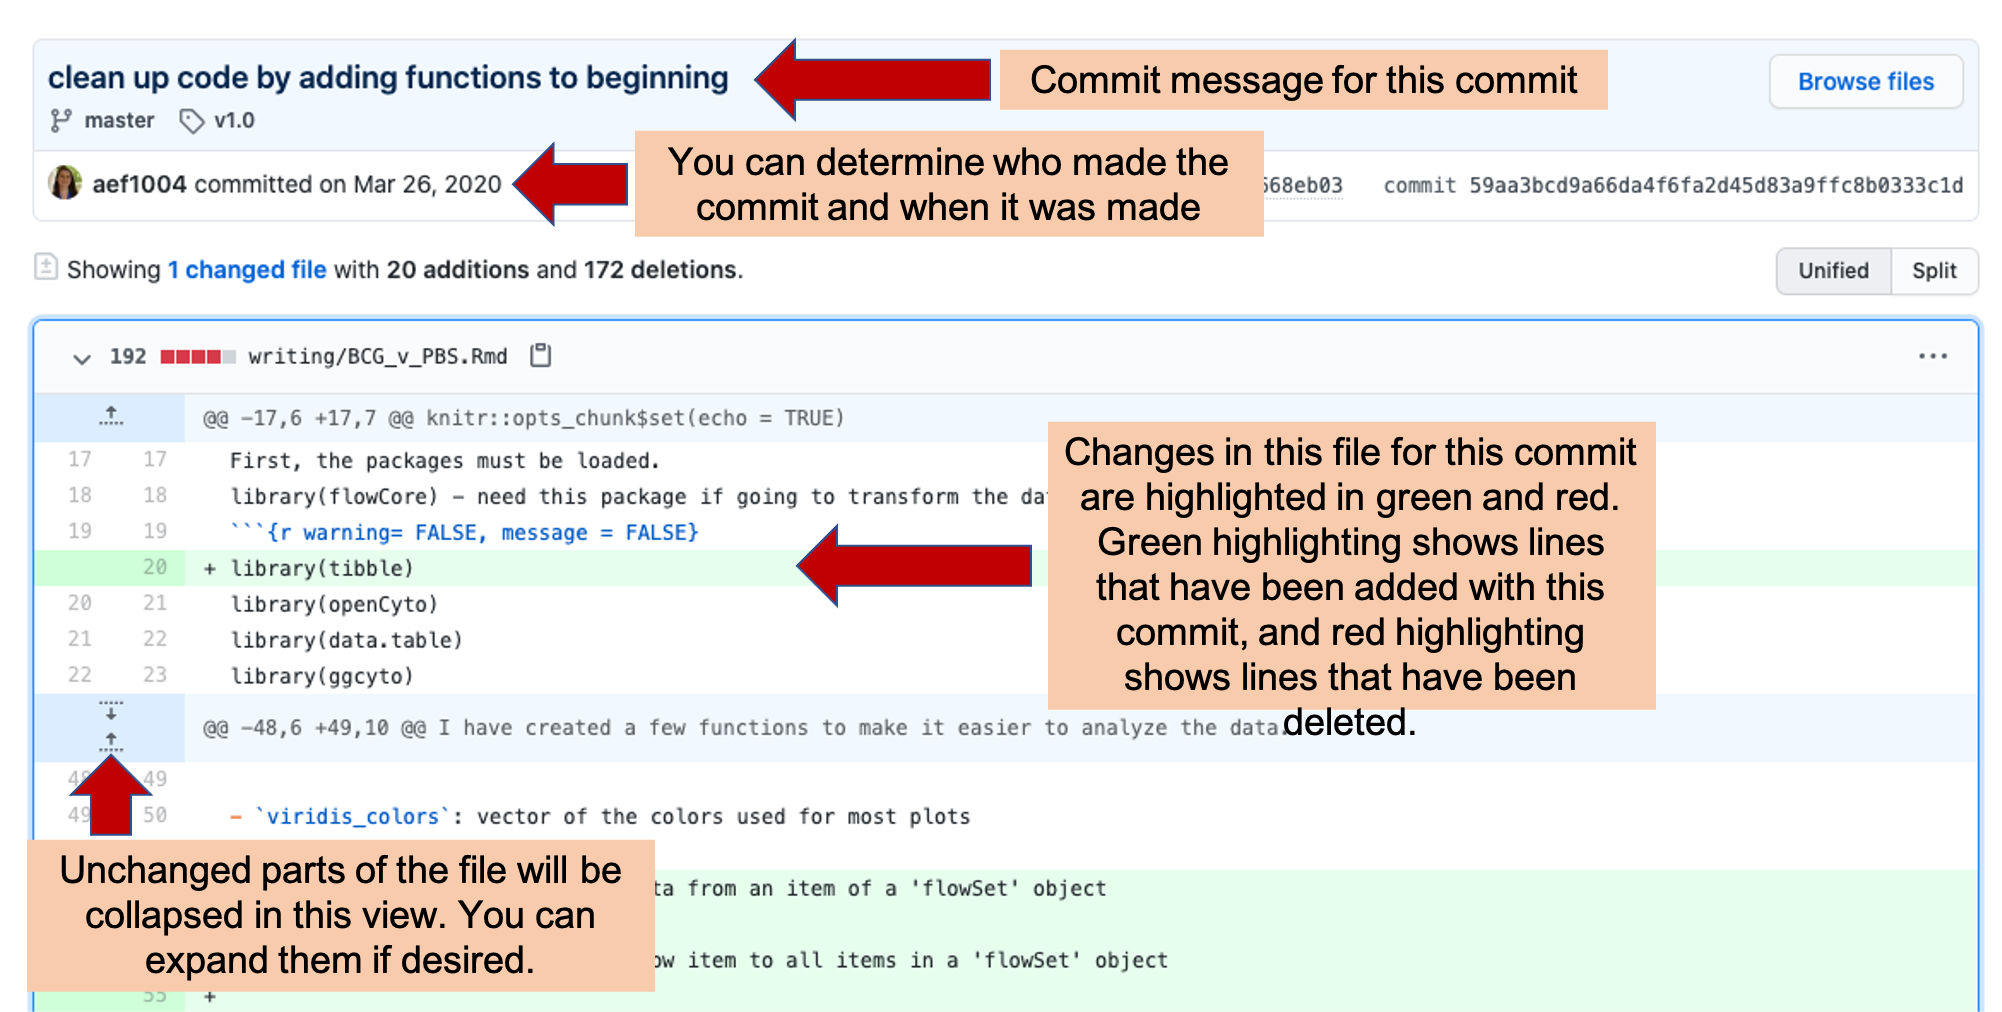
Figure 2.8: Commit history in GitHub. Each commit has its own page, where you can explore what changes were made with the commit, who made them, and when they were committed.
Issues
GitHub, as well as other version control platforms, includes functionality that will help your team collaborate on a project. A key tool is the “Issues” tracker. Each repository includes this type of tracker, and it can be easily used by all team members, whether they are comfortable coding or not.
Figure 2.9 gives an example of the Issues tracker page for the repository we are using as an example.
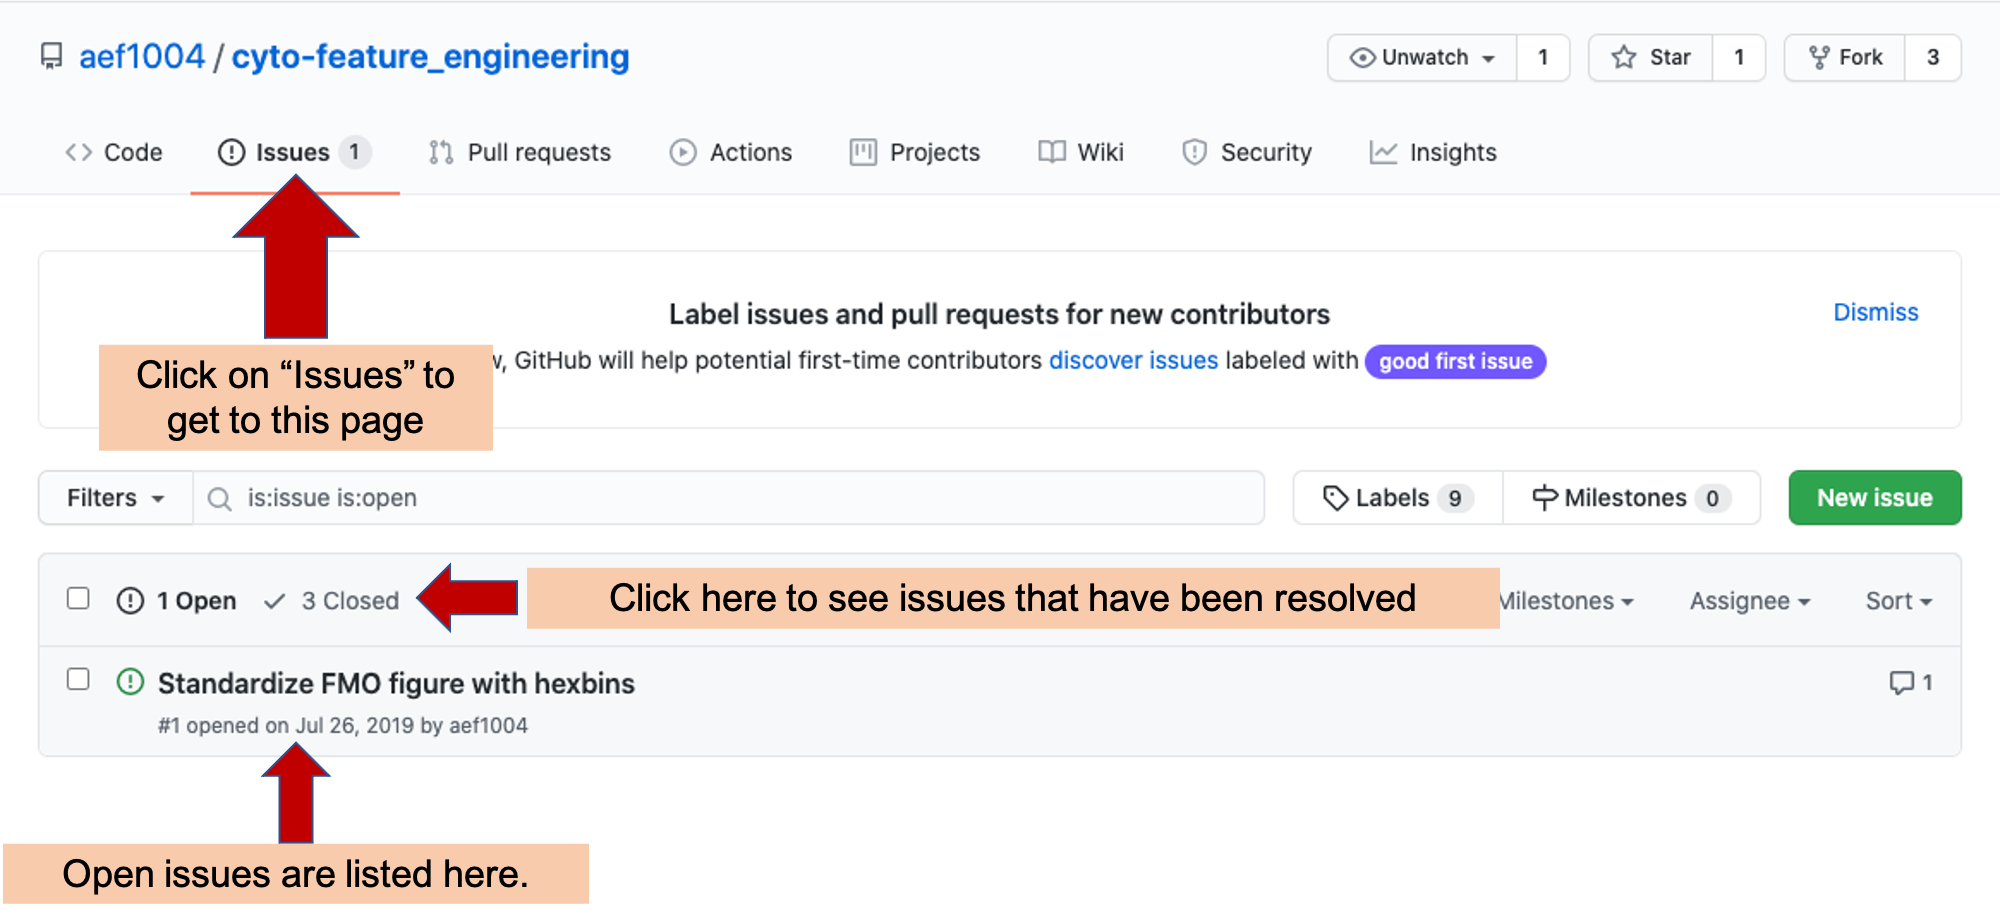
Figure 2.9: Issues tracker page for an example GitHub repository. Arrows highlight the tab to click to get to the Issues tracker page in a repository, as well as where to go to find open and closed Issues for the repository.
The main Issues tracker page provides clickable links to all open issues for the repository. You can open a new issue using the “New Issue” on this main page or on the specific page of any of the repository’s issues (see Figure 2.10 for an example of this button).

Figure 2.10: Conversation about an Issue on Issues tracker page of an example GitHub repository. In this example, you can see how GitHub Issues trackers allow you to discuss how to resolve an issue across your team. From this page, you can read the current conversation about Issue #1 of the repository and add your own comments. Once the Issue is resolved, you can ‘Close’ the Issue, which moves it off the list of active issues, but allows you to still re-read the conversation and, if necessary, re-open the issue later. You can also open a new issue from this page, using the button highlighted at the top right.
On the page for a specific issue (e.g., Figure 2.10), you can have a conversation with your team to determine how to resolve the issue. This conversation can include web links, figures, and “To-do” check boxes, to help you discuss and plan how to resolve the issue. Each issue is numbered, which allows you to track each individually as you work on the project.
Once you have resolved an issue, you can “Close” it. This moves the issue from the active list into a “Closed” list. Each closed issue still has its own page, where you can read through the conversation describing how it was resolved. If you need to, you can re-open a closed issue later, if you determine that it was not fully resolved.
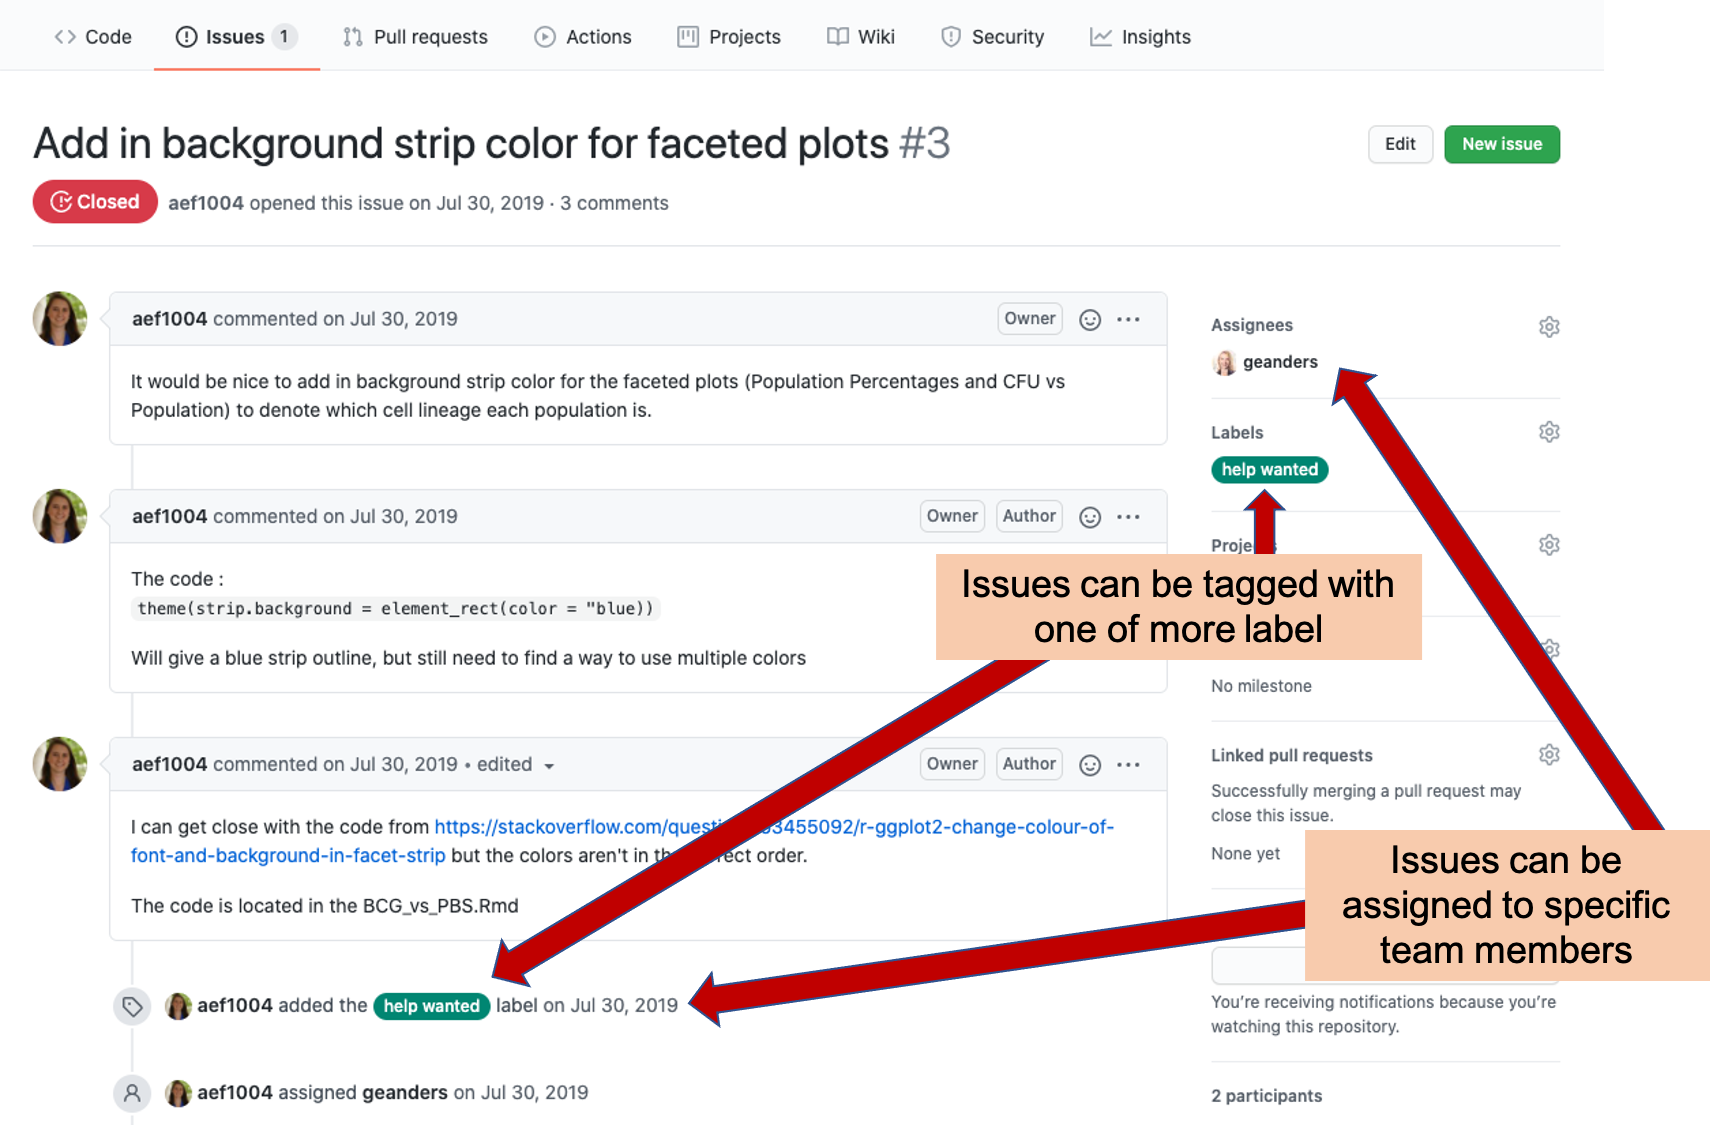
Figure 2.11: Labeling and assigning Issues. The GitHub Issues tracker allows you to assign each issue to one or more team members, clarifying that they will take the lead in resolving the issue. It also allows you to tag each issue with one or more labels, so you can easily navigate to issues of a specific type or identify the category of a specific issue.
The Issues tracker page includes some more advanced functionality, as well (Figure 2.11). For example, you can “assign” an issue to one of more team members, indicating that they are responsible for resolving that issue. You can also tag each issue with one of more labels, allowing you to group issues into common categories. For example, you could tag all issues that cover questions about pre-processing the data using a “pre-processing” label, and all that are related to creating figures for the final manuscript with a “figures” label.
Repository access and ownership
Repositories include functionality for inviting team members, assigning roles, and otherwise managing access to the repository. First, a repository can be either public or private. For a public repository, anyone will be able to see the full contents of the repository through GitHub. You can also set a repository to be private. In this case, the repository can only be seen by those who have been invited to collaborate on the repository, and only when they are logged in to their GitHub accounts. The private / public status of a repository can be changed at any time, so if you want you can maintain a repository for a project as private until you publish the results, and then switch it to be public, to allow others to explore the code and data that are linked to your published results.
You can invite team members to collaborate on a repository, as long as they have GitHub accounts (these are free to sign up for). While public repositories can be seen by anyone, the only people who can add to or change the contents of the repository are people who have been invited to collaborate on the repository. The person who creates the repository can invite other collaborators through the “Settings” tab of the repository, which will have a “Manage access” function for the repositories maintainer. On this page, you can invite other collaborators by searching using their GitHub “handle” (the short name they chose to be identified by in GitHub). You can also change access rights, for example, allowing some team members to be able to make major changes to the repository—like deleting it—while others can make only smaller modifications.
Insights
Each GitHub repository also provides an “Insights” page, which lets you see who is contributing to the project and, as well when and how much they have contributed, as tracked by the commits they’ve made.
First, this page provides some repository-wide summaries, regardless of who was contributing. The figure below shows an example of the “Code frequency” graph, showing the number of additions and deletions to the code each week (here, “code” means any data in the tracked files, so it would include data recorded for the project or text written up for a project report or presentation [double-check that this is the case]).
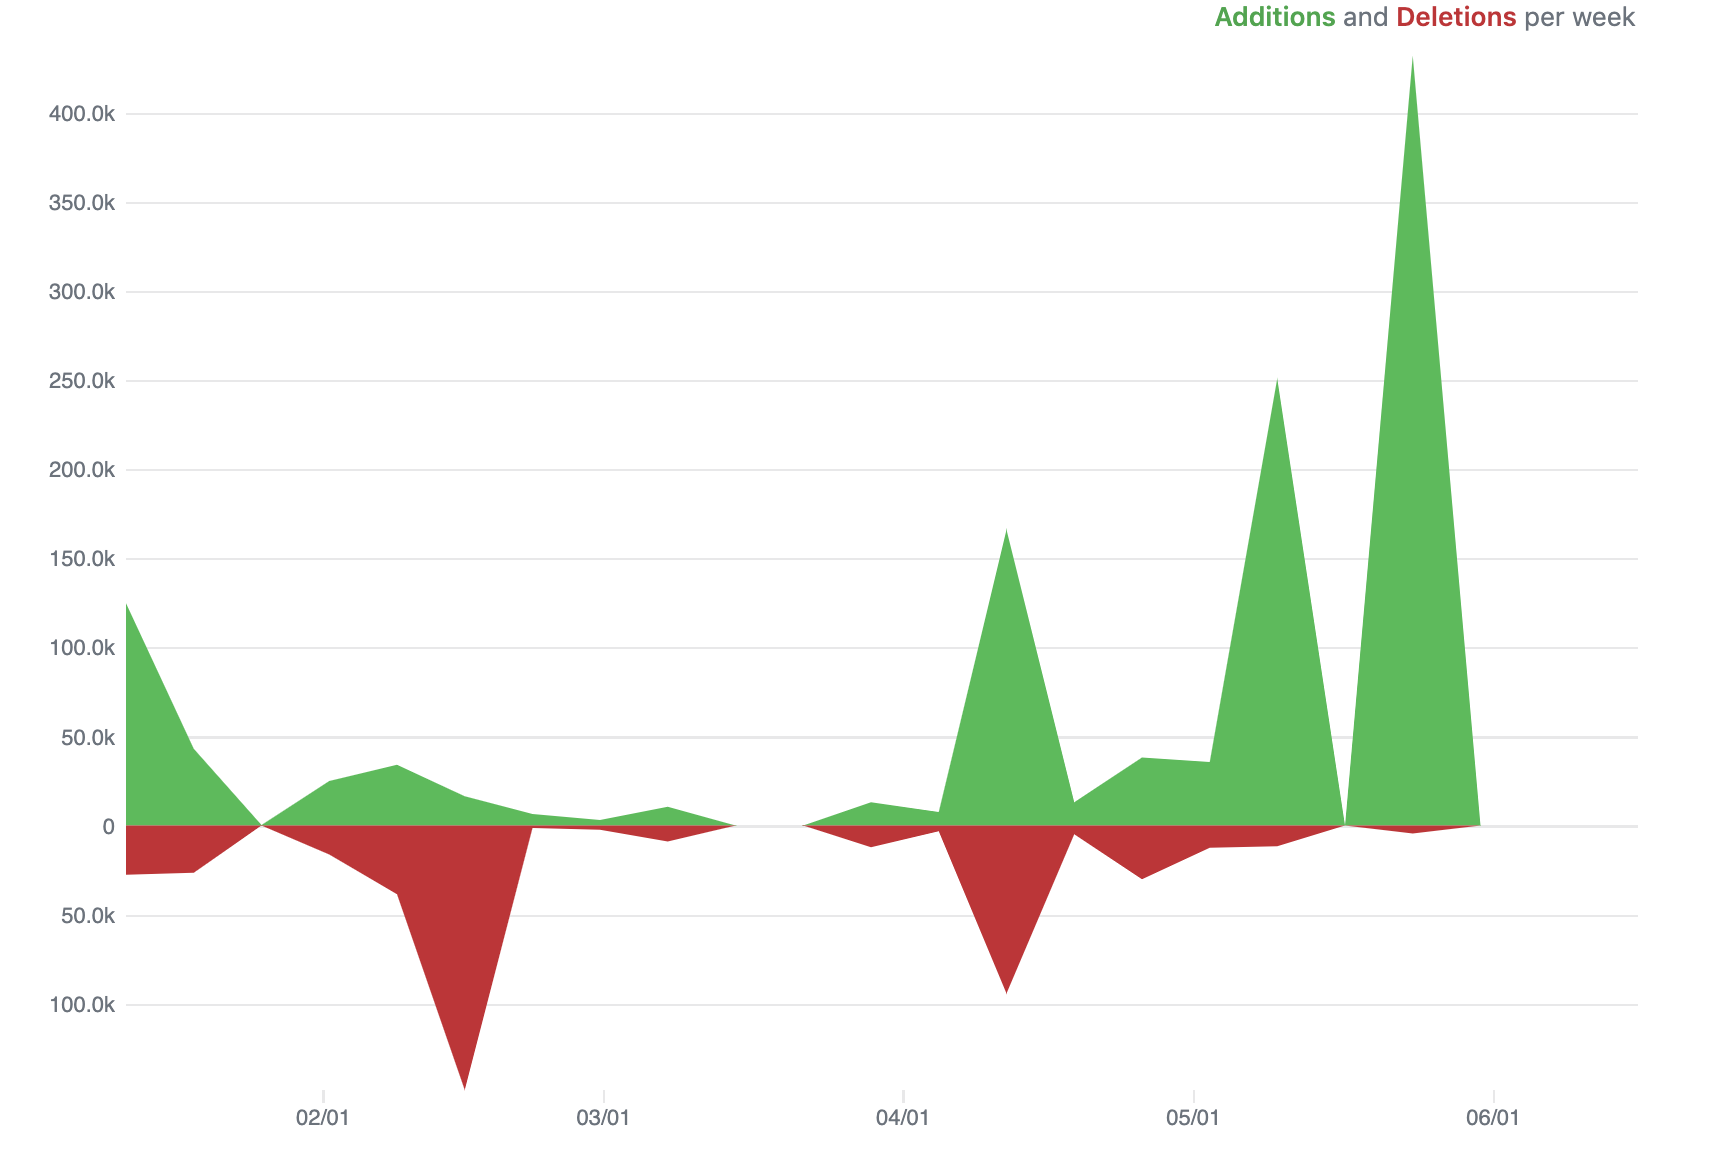
During periods when the research team is collecting data, you would expect a lot more additions that deletions, and you could check this plot to ensure that the team is committing data soon after it’s recorded (i.e., that there are lots of additions on weeks with major data collection for the experiment, not several weeks after). Periods with a lot of deletions, aren’t bad, but instead likely indicate that a lot of work is being done in editing reports and manuscripts. For example, if a paper is being prepared for publication, you’d expect a lot of delections as the team edits it to meet word count requirements.
The “Insights” page on a GitHub repository also lets you track the frequency of commits to the project, where each commit could be something small (like fixing a typo) or large (adding new data files for all data recorded for a timepoint for the experiment). However, the frequency of these commits can help identify periods when the team is working on the project. For example, the commit history graph shown below is for the GitHub repository for a website for a spring semester course in 2020. It’s clear to see the dates when the course was in session, as well as how the project required a lot of initial set up (shown by the number of commits early in the project period compared to later). You can even see spring break in mid-March (the week in the middle with no commits).
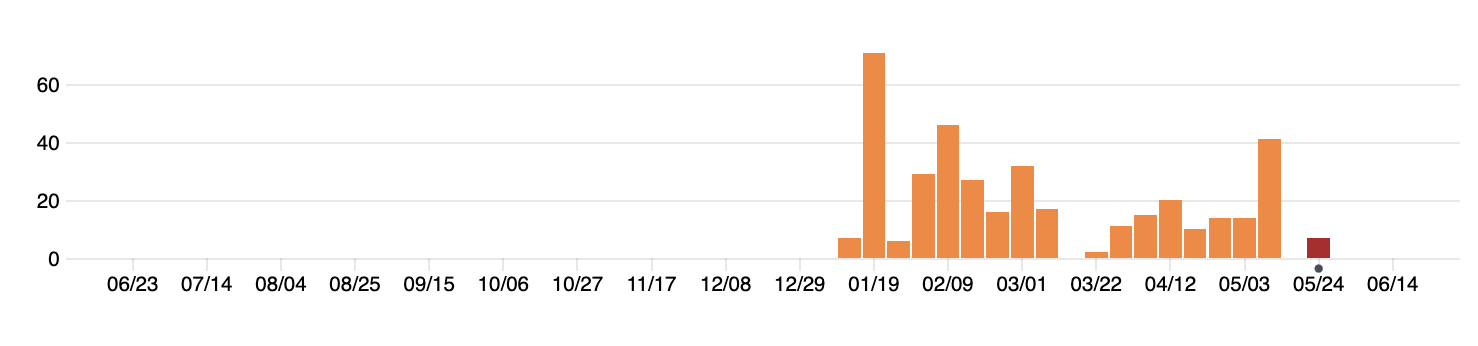
This window also allows you to track the number and timing of commits of each contributor to the project.
2.11.3 Leveraging git and GitHub as a scientist who programs
To be able to leverage GitHub to manage projects and share data, you will need to have at least one person in the research group who can set up the initial repository. GitHub repositories can be created very easily starting from an RStudio Project, a format for organizing project files that was described in module [x]. In this section, we’ll give some advice on how you can use an RStudio Project to create and update a GitHub repository, and how this can allow separate team members to maintain identical copies of the RStudio Project on their own computers, while continually evolving files in the project as data pre-processing, data analysis, and manuscript preparation are done for the project. We will keep this advice limited, as there are excellent existing resources that provide more thorough instructions in this area, but we will introduce the methods and then point to more thorough resources for more detail.
- Interfacing with RStudio
- Initiating a repository and first commit
- Subsequent commits and commit messages
- Fixing merge conflicts when team members make concurrent changes
- Using branches and forks / pull requests to try out new things
- Using GitHub Actions for automation (e.g., automatic testing?)
- [Odds and ends—.DS_Store, $Word_doc]
- More resources for learning to use git and GitHub
“Get a new repository in the directory you are working in via:
git init. Ok, you now have a revision control system in place. You might not see it, because Git stores all its files in a directory names.git, where the dot means that all the usual utilities likelswill take it to be hidden. You can look for it via, e.g.,ls -aor via a show hidden files option in your favorite file manager. … Given that all the data about a repository is in the.git\ subdirectory of your project directory, the analog to freeing a repository is simple:rm -rf .git`.” (Klemens 2014)
“Calling
git commit -awrites a new commit object to the repostiory based on all the changes the index was able to track, and clears the index. Having saved your work, you can now continue to add more. Further—and this is the real, major benefit of revision control so far—you can delete whatever you want, confident that it can be recovered if you need it back. Don’t clutter up the code with large blocks of commented-out obsolete routines—delete!” (Klemens 2014)
“Having generated a commit object, your interactions with it will mostly consist of looking at its contents… The key metadata is the name of the object, which is assigned via an unpleasant but sensible naming convention: the SHA1 has, a 40-digit hexadecimal number that can be assigned to an object, in a manner that lets us assume that no two objects will have the same hash, and that the same object will have the same name in every copy of the repository. When you commit your files, you’ll see the first few digits of the hash on the screen… Fortunately, you need only as much of the hash as will uniquely identify your commit.” (Klemens 2014)